User Guide
This guide walks through the system role by role: what a server does at the till, how the kitchen screen is read, how an owner closes the day, and how the vendor manages customer accounts. Every screenshot is taken from the running system.
CHAPTER 1Getting started
Possfer runs in a browser. There is nothing to install and no proprietary terminal to buy — any tablet, laptop or touchscreen with a browser can be a till.
Addresses and sign-in
| Screen | Address | Who uses it |
|---|---|---|
| Staff sign-in | /login | All restaurant staff |
| Point of sale | /pos | Servers, managers |
| Kitchen display | /kitchen | Kitchen, bar |
| Self-service kiosk | /kiosk | Guests |
| Customer display | /display/menu | Guest-facing second screen |
| Back office | /dashboard | Owner, manager |
| Vendor console | /platform/login | Software vendor |
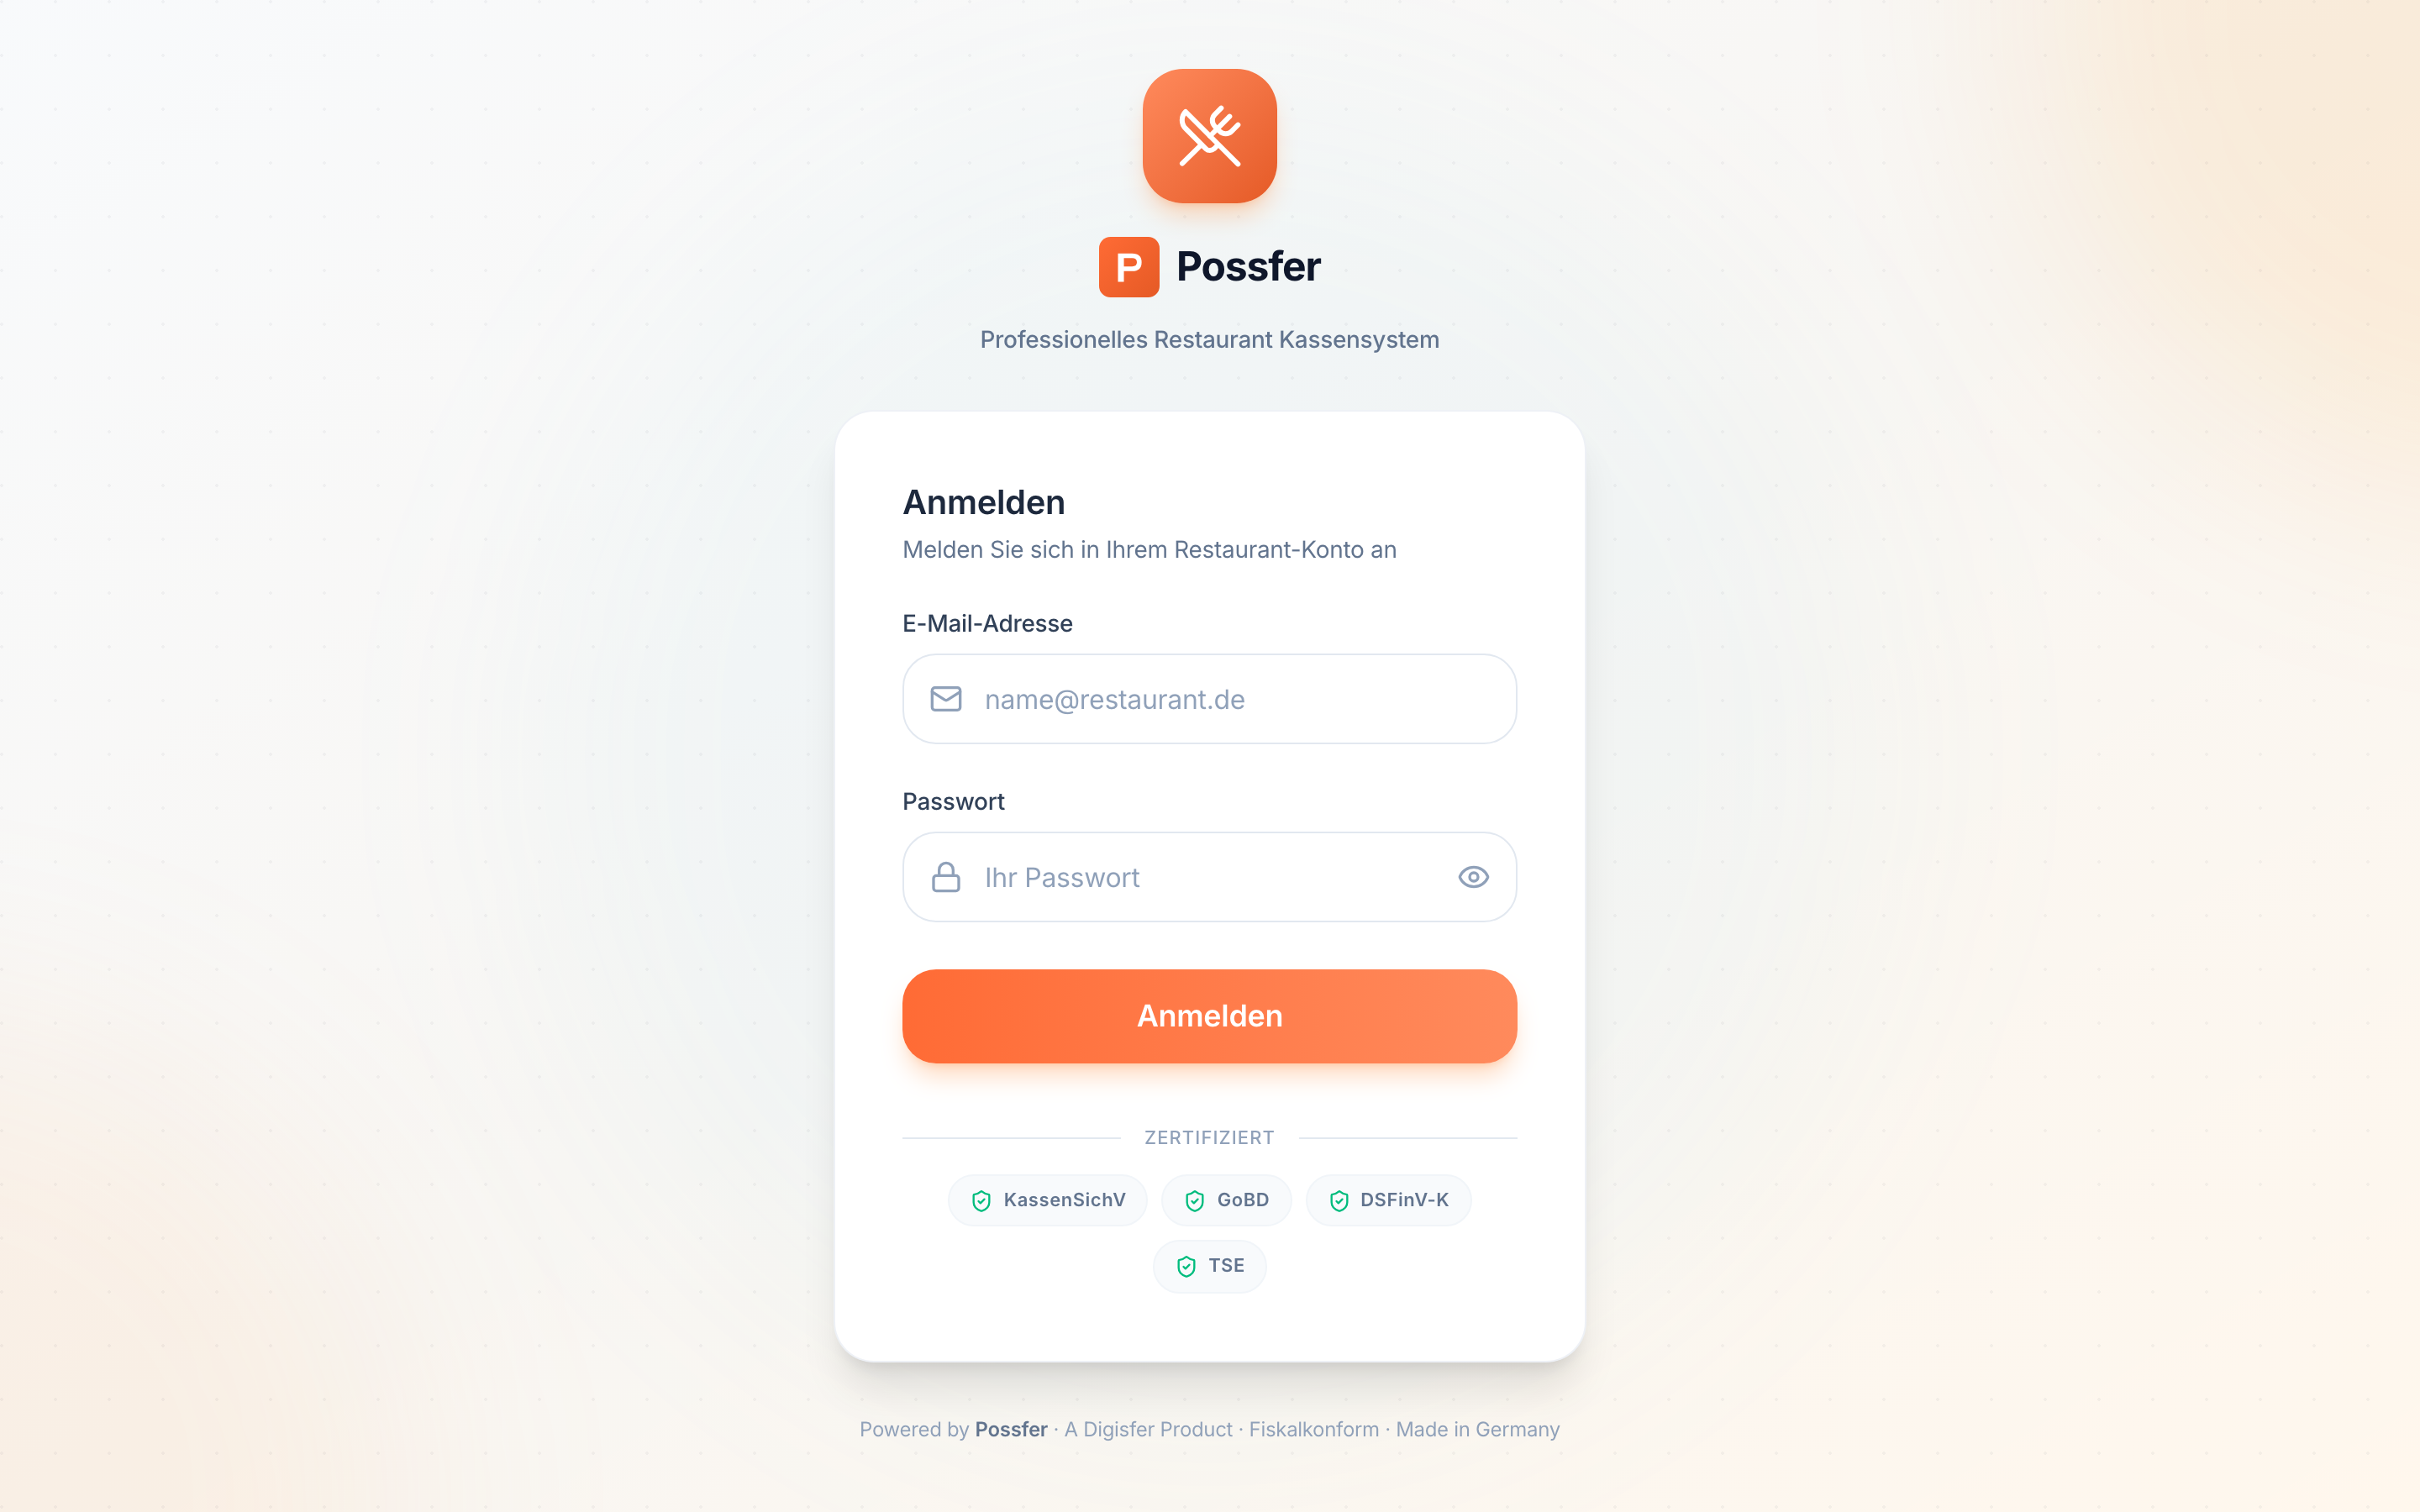 1
2
3
1
2
3
- 1Type your email address here
- 2Type your password here
- 3Press this to sign in
Roles and permissions
| Role | What it can do | Typical user |
|---|---|---|
| Admin | Everything: settings, staff, prices, financial reports | Owner |
| Manager | Daily operations, reports, day end, scheduling | General manager |
| Server | Till: ordering, payment, table management | Front of house |
| Kitchen | Kitchen display only | Line cooks, bar |
| Kiosk | Self-service terminal only | Guest terminal |
A note on interface language
CHAPTER 2Point of sale — the server's screen
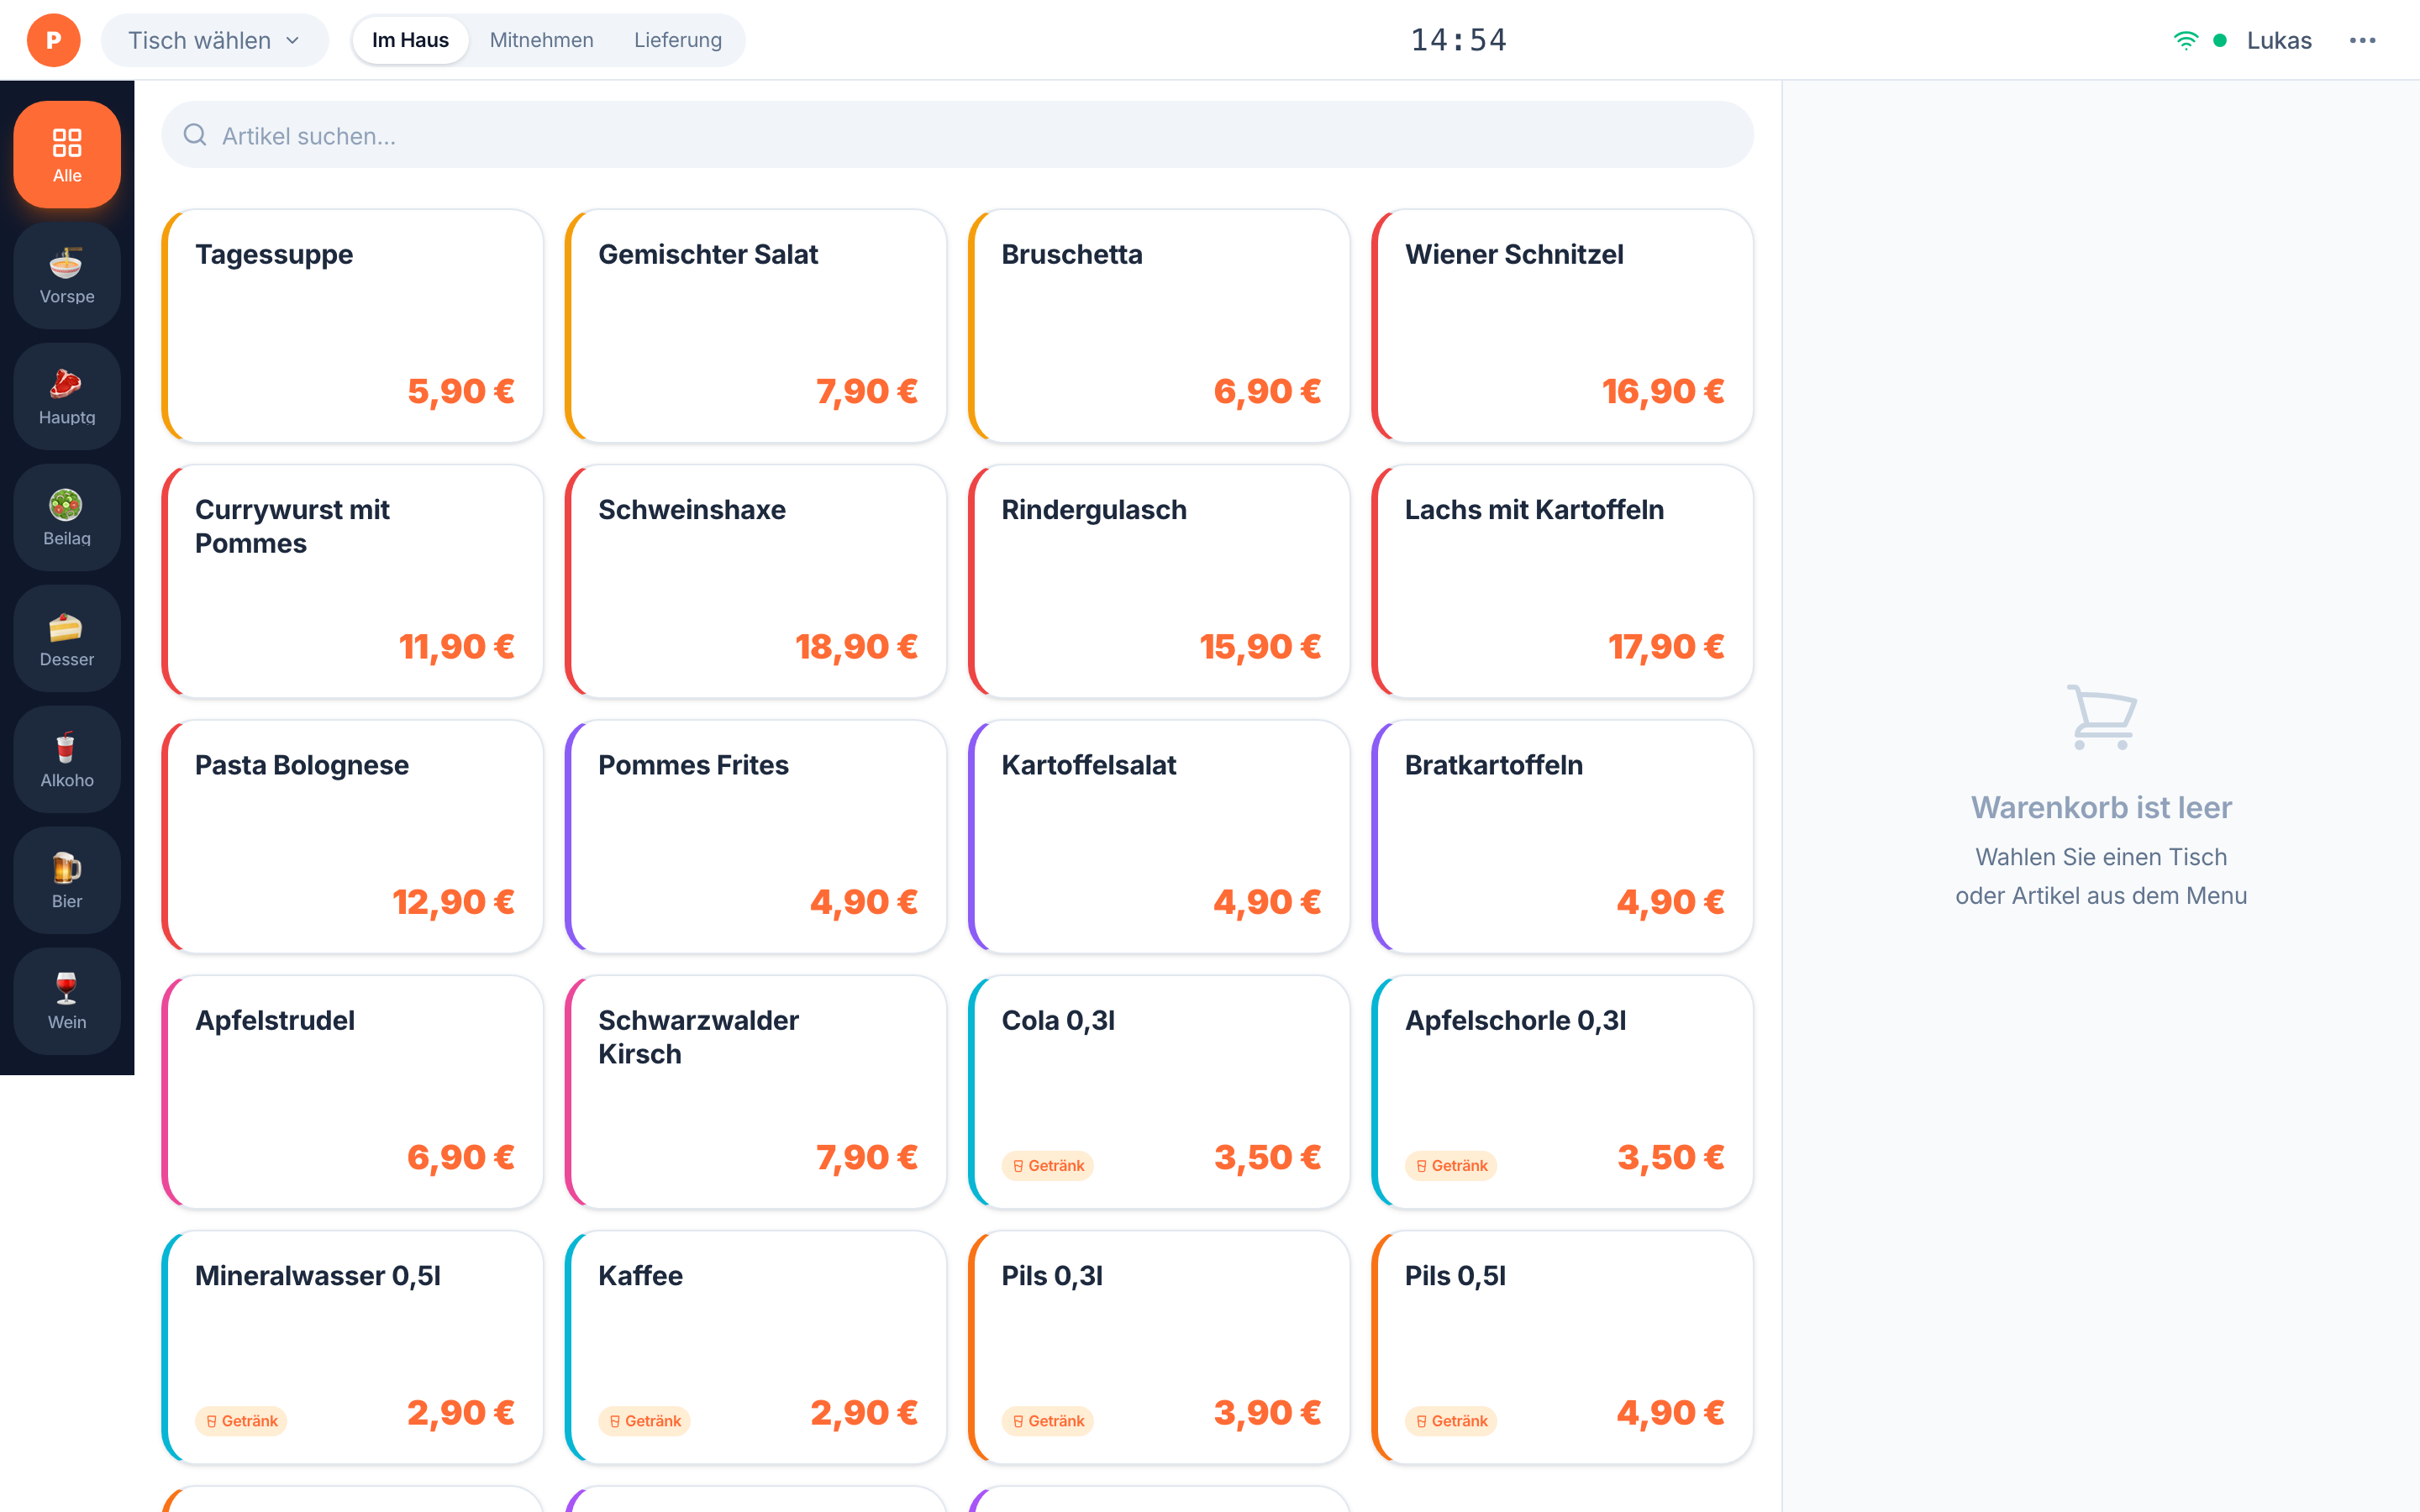
The till has three areas: categories on the left, items in the middle, the cart on the right. The top bar carries table selection and the dine-in / takeout / delivery switch.
 1
2
3
4
5
6
1
2
3
4
5
6
- 1"Tisch wählen" = Select table. Choose which table the order belongs to
- 2"Im Haus" = Dine-in. This choice drives the tax rate
- 3"Mitnehmen" = Takeout. Use it when the guest takes the food away
- 4"Lieferung" = Delivery order
- 5"Artikel suchen" = Search items. Type a name to find it on a long menu
- 6"Warenkorb" = Cart. Items you tap collect here
Taking an order
- Choose the table from Tisch wählen (select table) at the top left. For a takeout sale skip the table and switch to Mitnehmen.
- Set the order type. This decides the tax treatment, so it must be right.
- Tap an item to add it to the cart, or search for it by name.
- Adjust quantity with the + and − controls on the cart line.
- Tap a cart line to add a note for the kitchen — for example "no onions" or "well done".
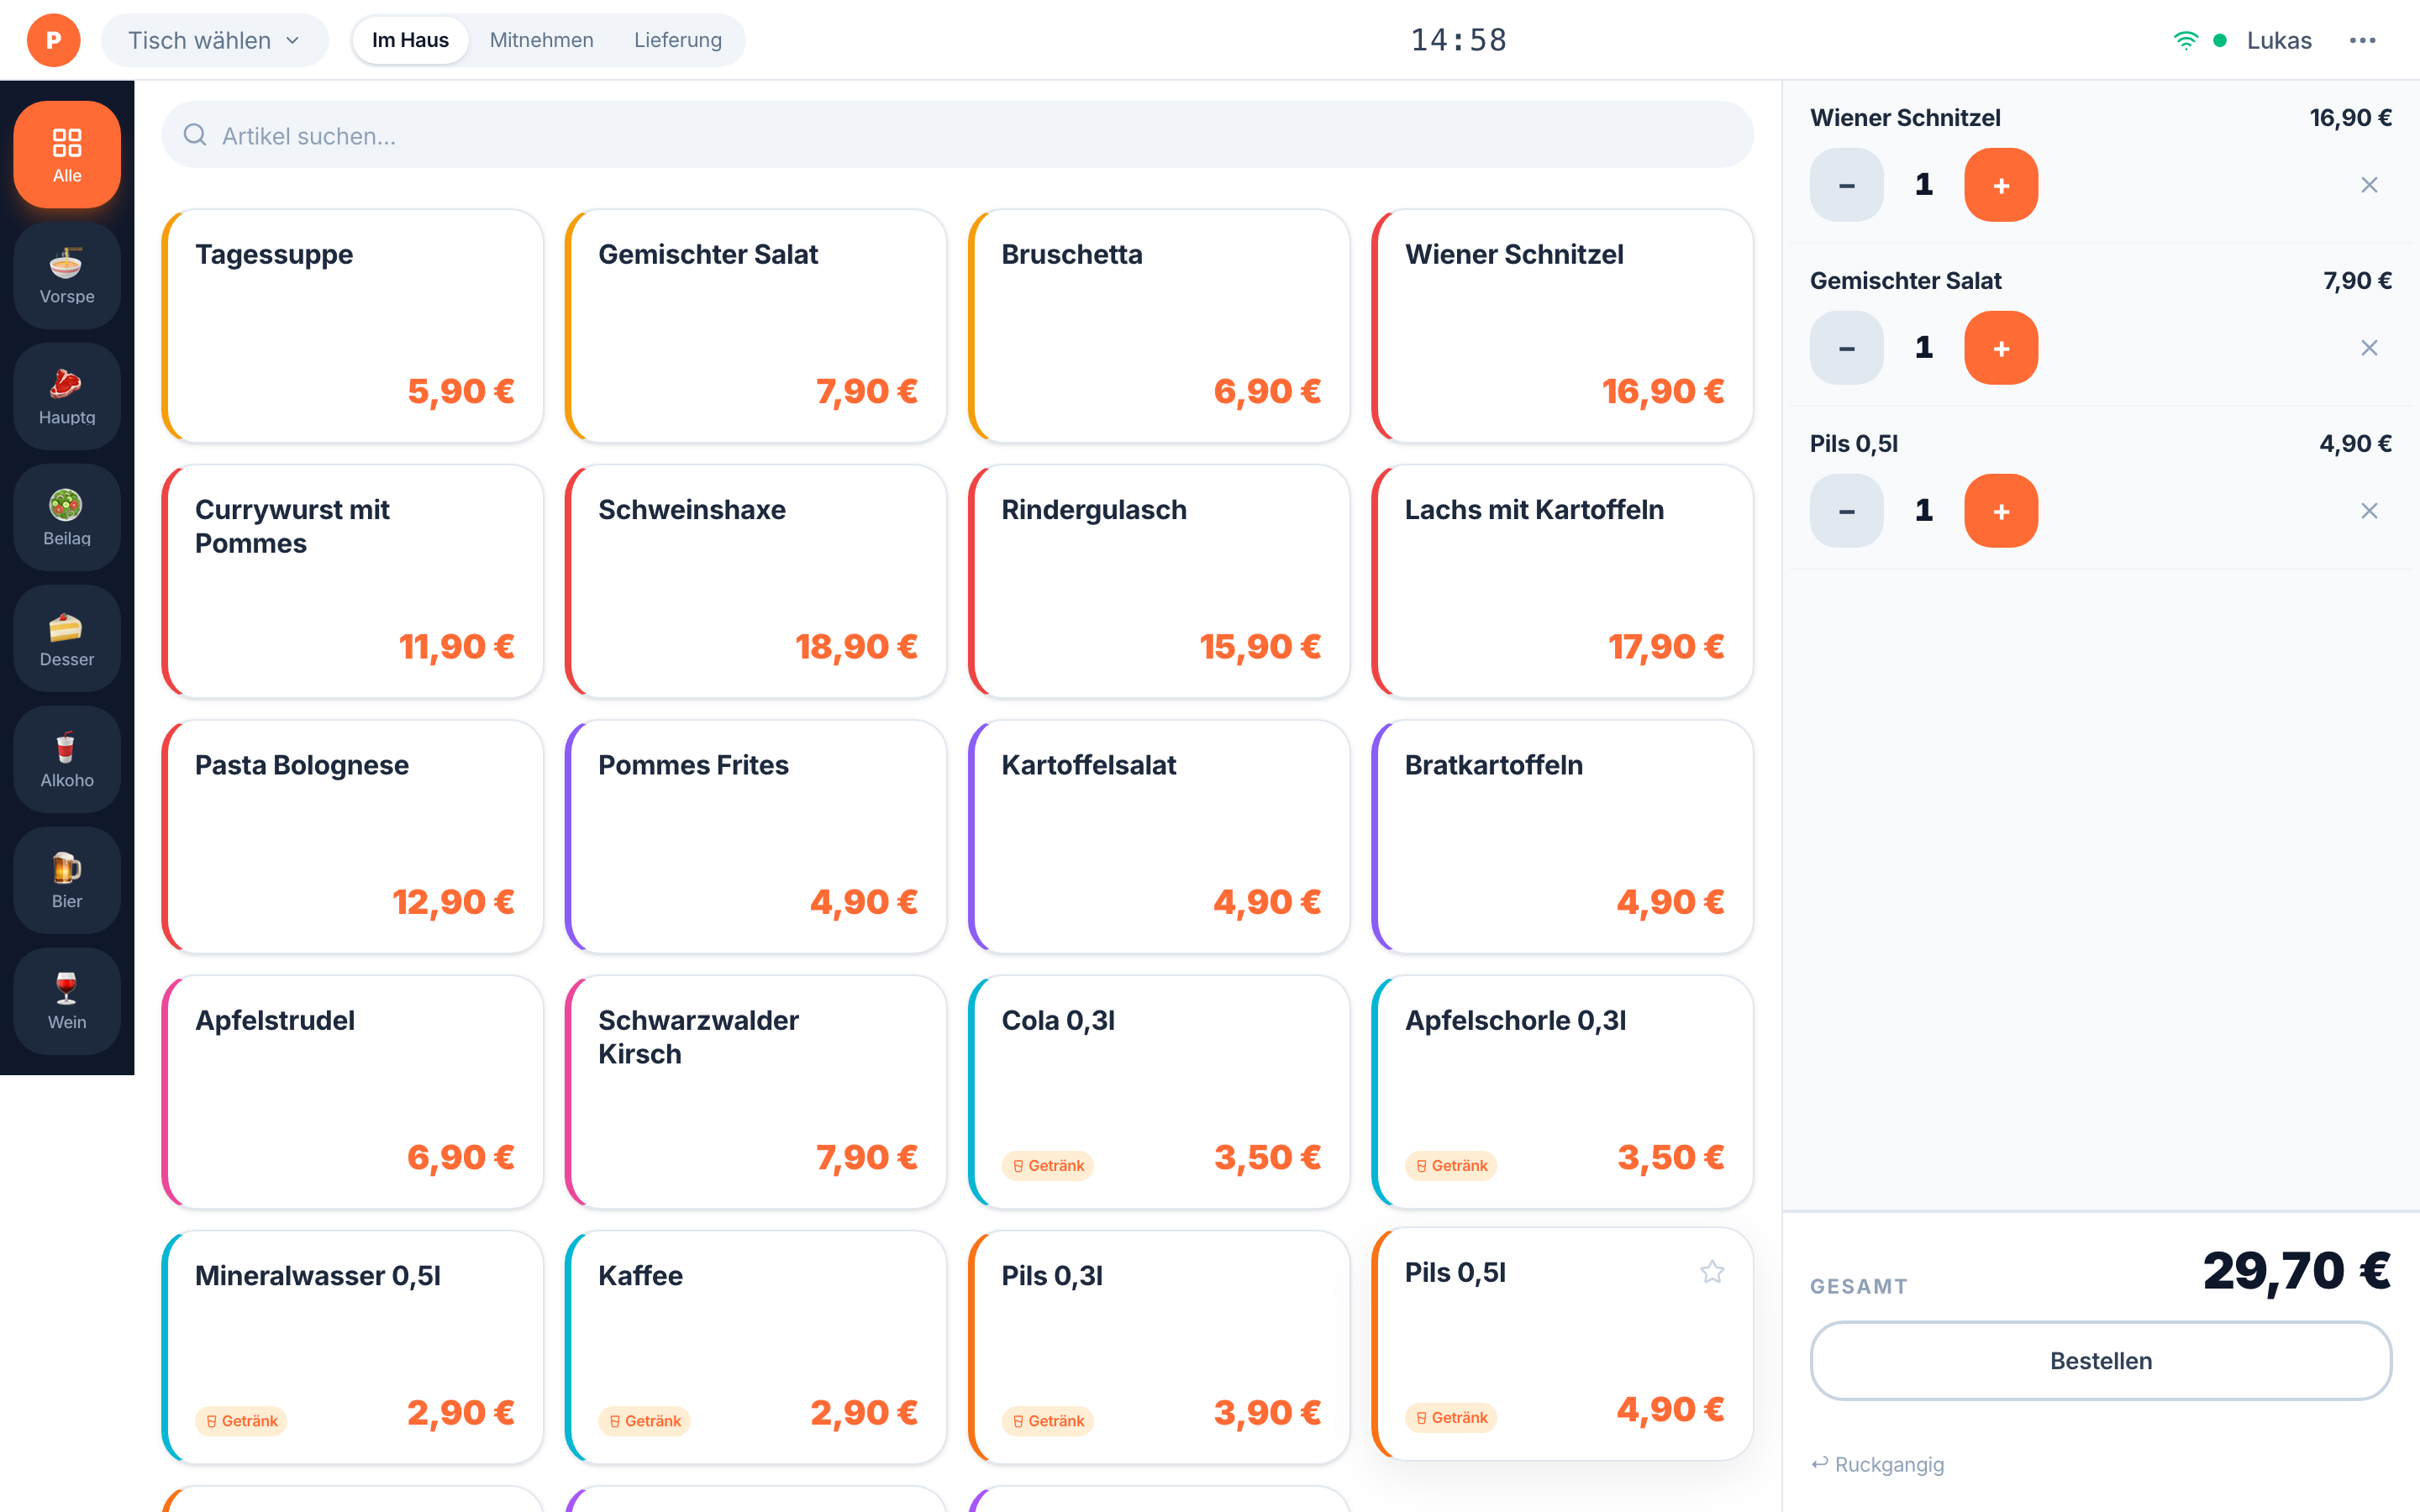
- Press Bestellen (send order). The ticket reaches the kitchen immediately.
 1
2
3
1
2
3
- 1A line in the cart: quantity and line total
- 2Subtotal and tax breakdown
- 3"Bestellen" = Send order. The kitchen sees nothing until you press this
Payment and receipt
- Tap the table to bring up its open bill.
- Press Bezahlen (pay). The payment window opens.
- Choose the payment method: cash or card.
- Enter a tip if there is one.
- To split the bill use Rechnung teilen (split bill) — by guest or by item.
- Confirm. The system records the transaction and produces the receipt.
- Print the receipt or email it to the guest.
CHAPTER 3Kitchen display
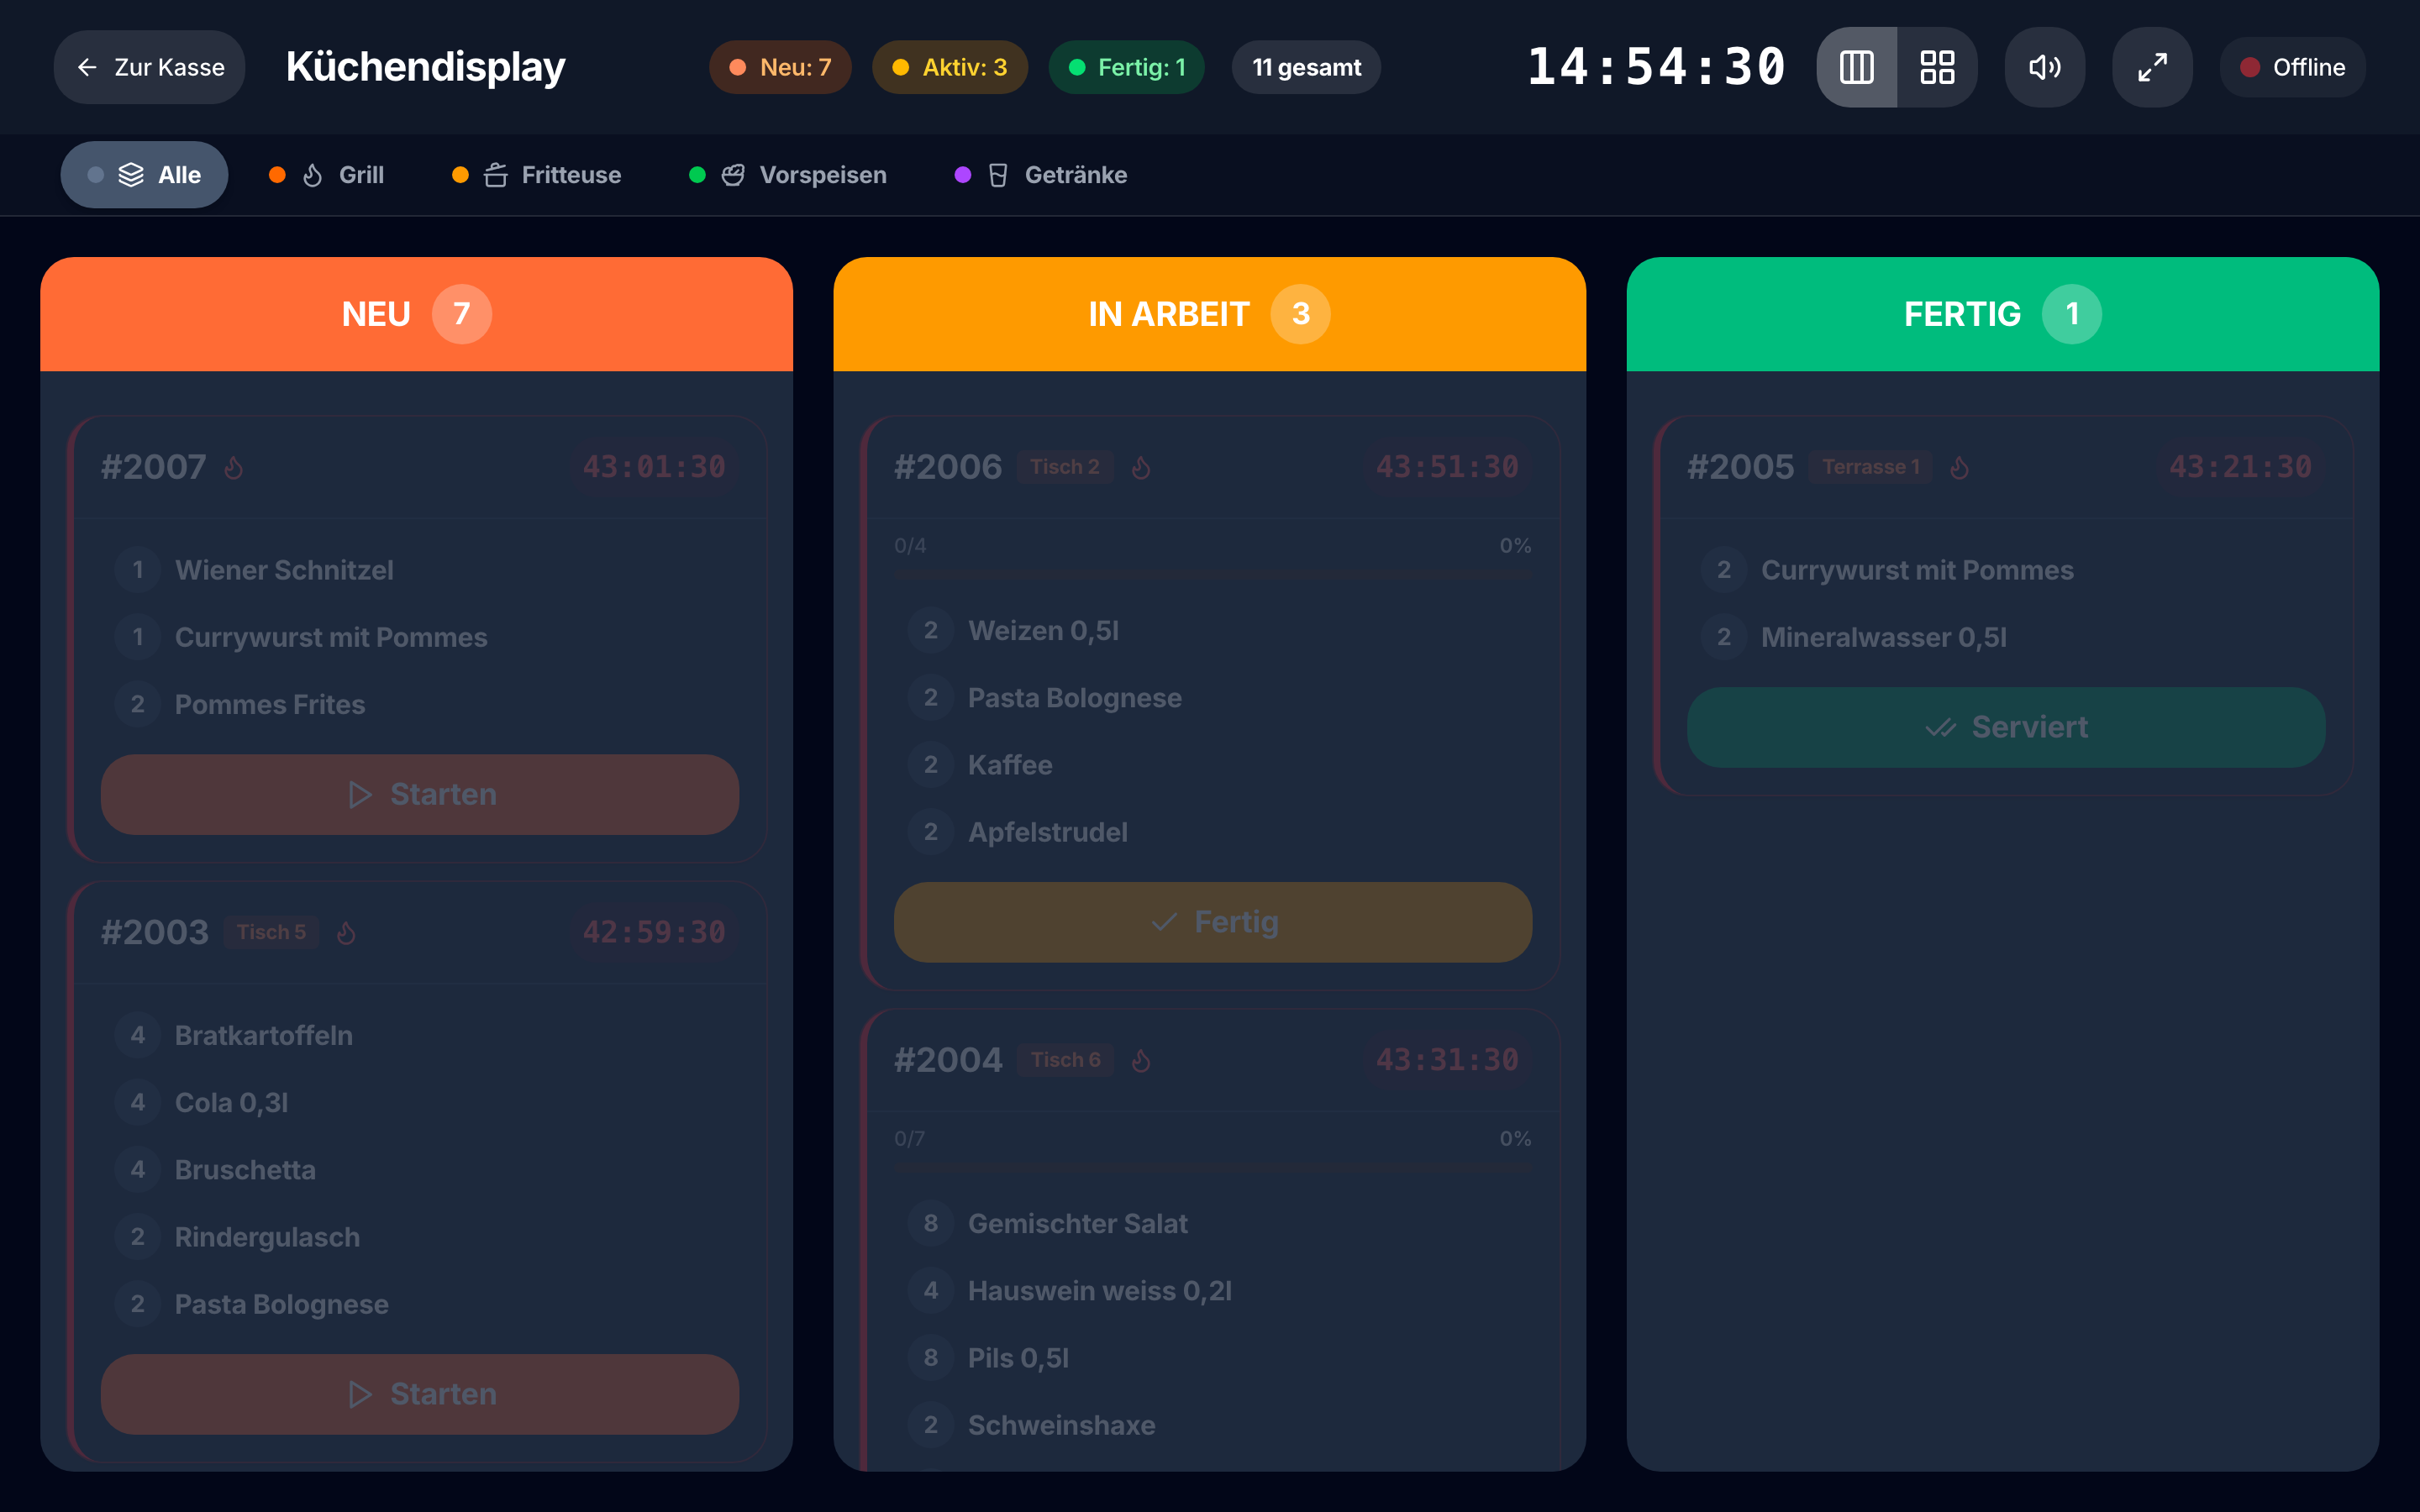
Tickets move left to right across three columns: new, in progress, ready. Each card shows the ticket number, the table and how long it has been open.
 1
2
3
4
5
6
1
2
3
4
5
6
- 1"Neu" = NEW: tickets that just arrived
- 2"In Arbeit" = IN PROGRESS: tickets being cooked
- 3"Fertig" = READY: tickets waiting to be run
- 4Station filter, so each section sees only its own work
- 5"Starten" = START. Press when you begin cooking; the ticket moves to the middle column
- 6"Fertig" = READY. Press when the food is up; the server sees it immediately
- A new ticket lands in the left column with an audible alert.
- Press Starten (start) when you begin cooking. The card moves to the middle column.
- Press Fertig (ready) when the food is up. Front of house sees it at once.
- Press Serviert (served) once it has been run to the table.
Use the station filters in the top strip so each section sees only its own tickets. For a bar screen, filter to drinks and switch to full screen.
CHAPTER 4Self-service and guest-facing screens
A touchscreen at the entrance. The guest orders and the ticket goes straight to the kitchen.
A QR code on the table opens that table's menu, so guests do not have to flag down a server.
A guest-facing second screen or wall board; the menu updates itself.
CHAPTER 5Back office
The back office is where the business is managed. The left menu is grouped into overview, operations, marketing, finance and administration.
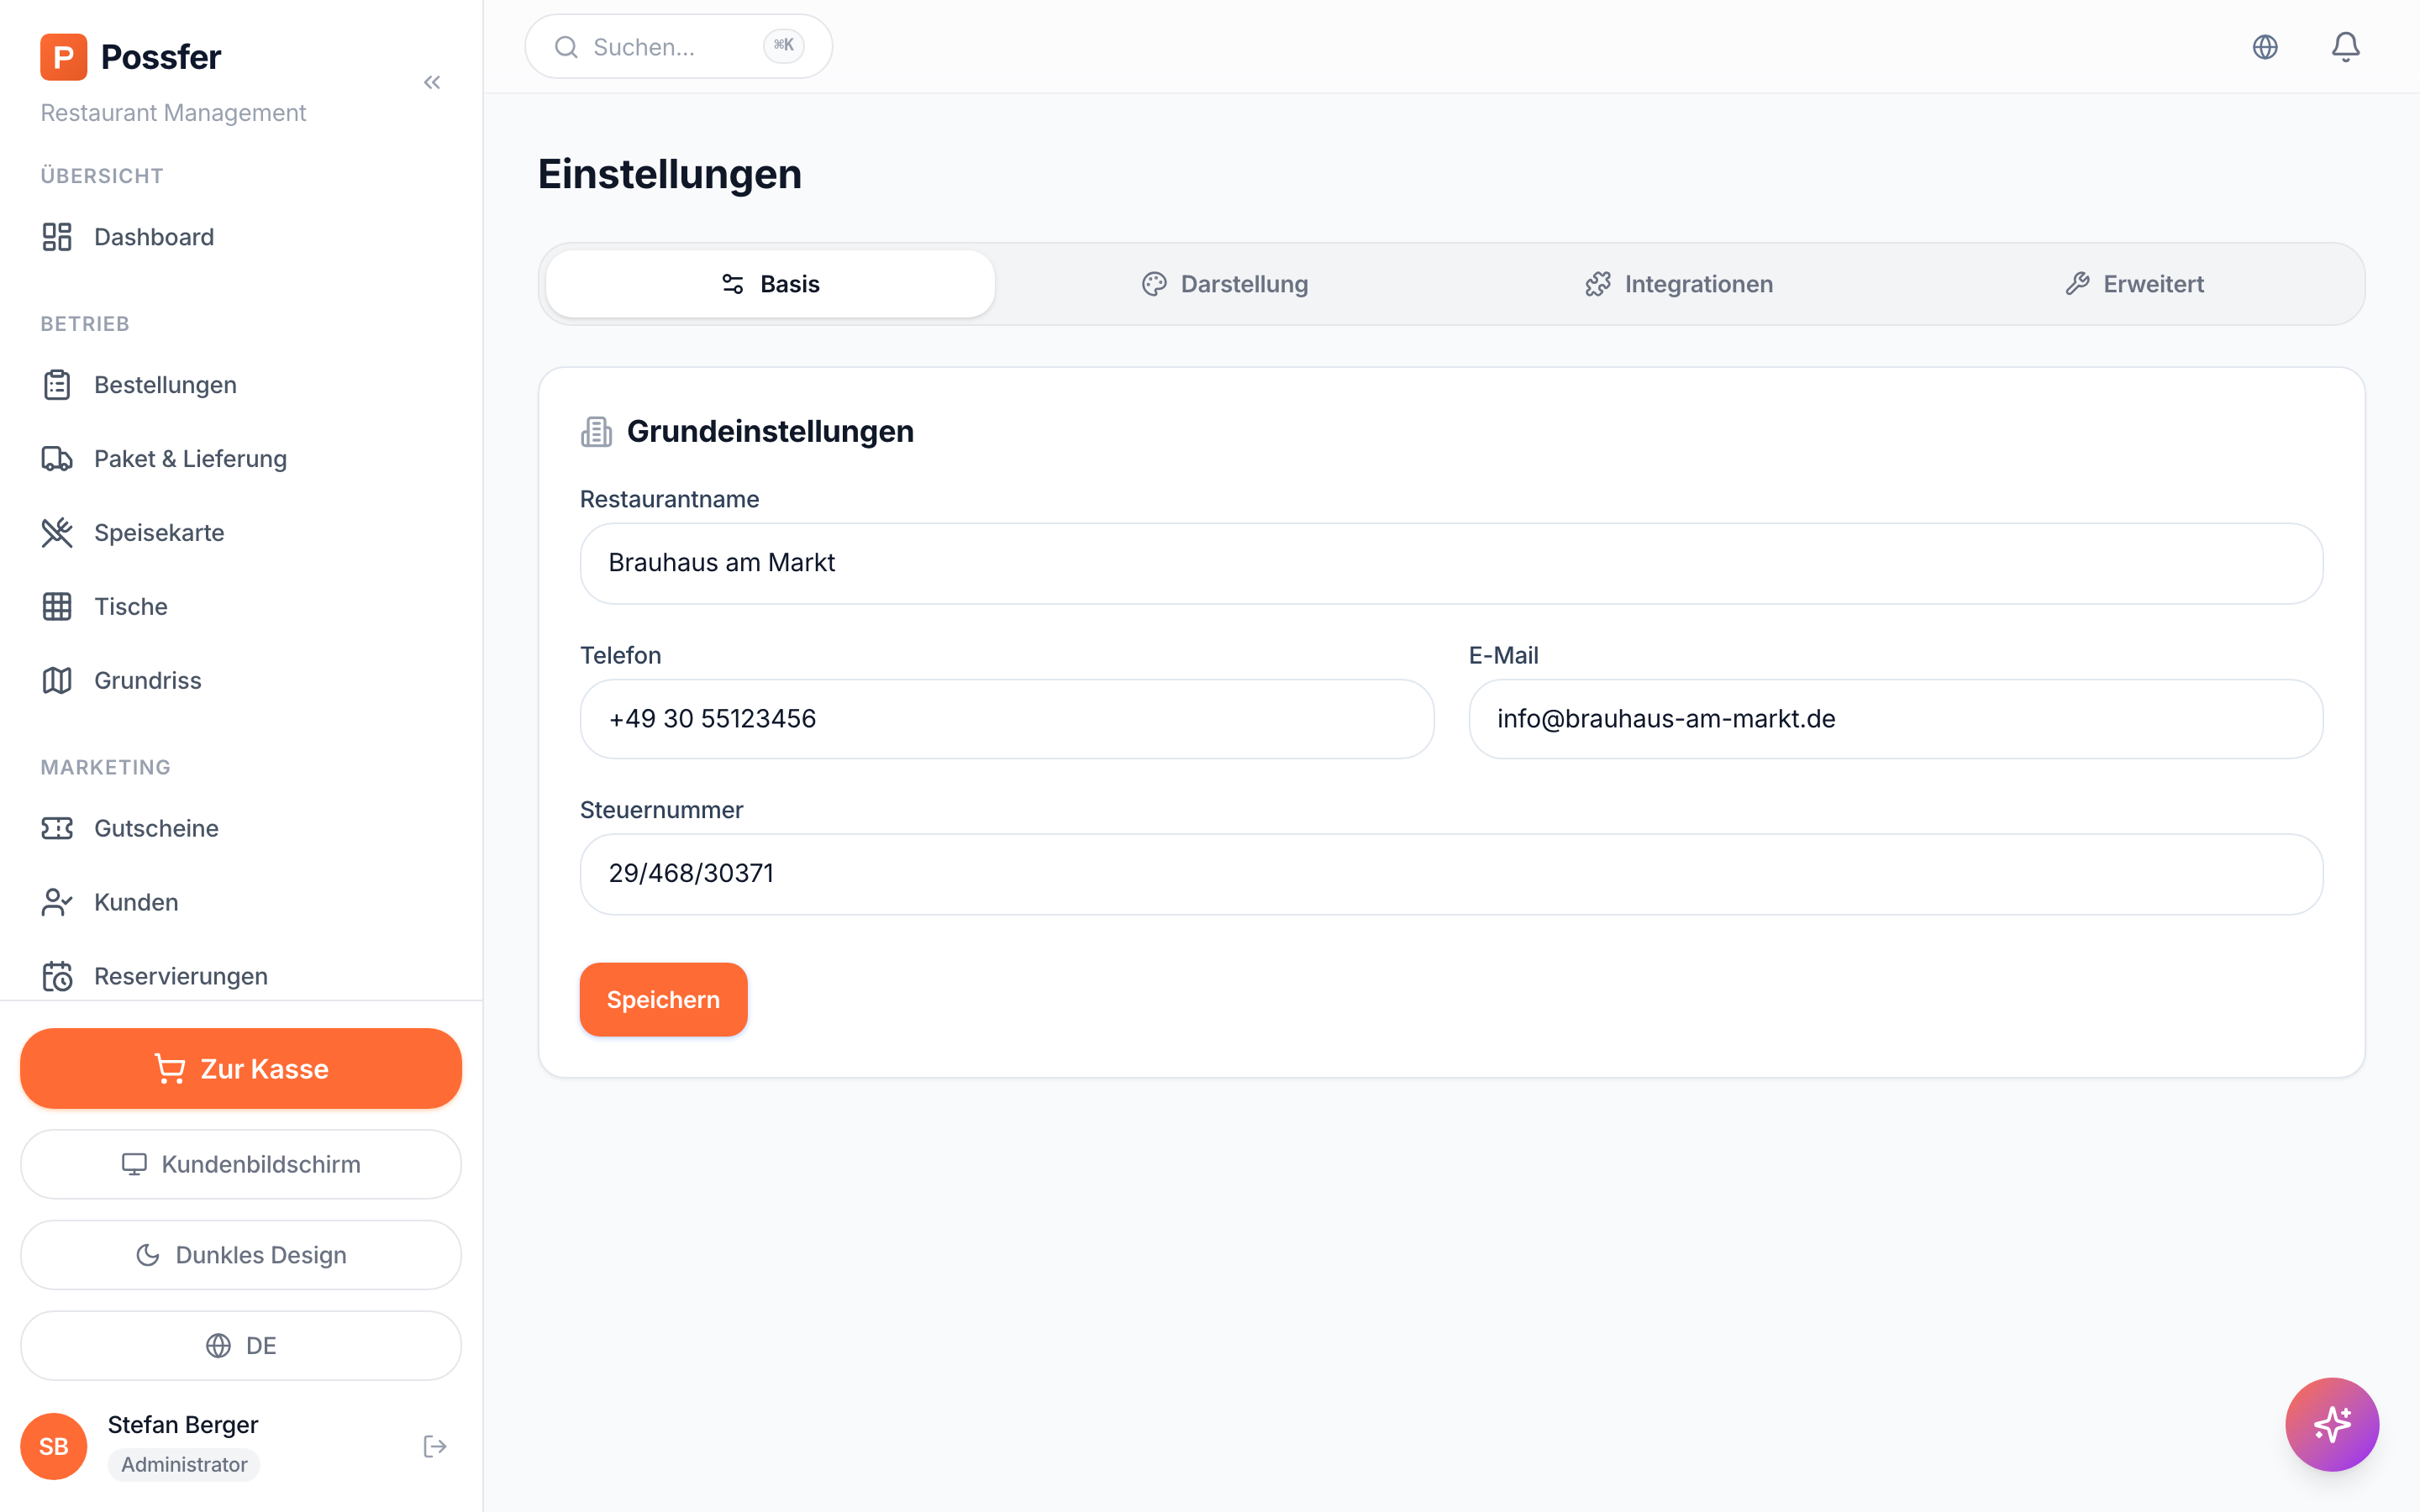
Business details
 1
2
3
4
1
2
3
4
- 1"Restaurantname" = Business name. This prints at the top of the receipt
- 2"Steuernummer" = Tax number. Legally required on the receipt
- 3"Telefon" = Phone number
- 4"E-Mail" = Email address
- Open Einstellungen (settings) from the left menu.
- Enter the legal business name in Restaurantname.
- Enter your tax registration number in Steuernummer.
- Add phone and email.
- Save, then take a test receipt at the till and check the details print correctly.
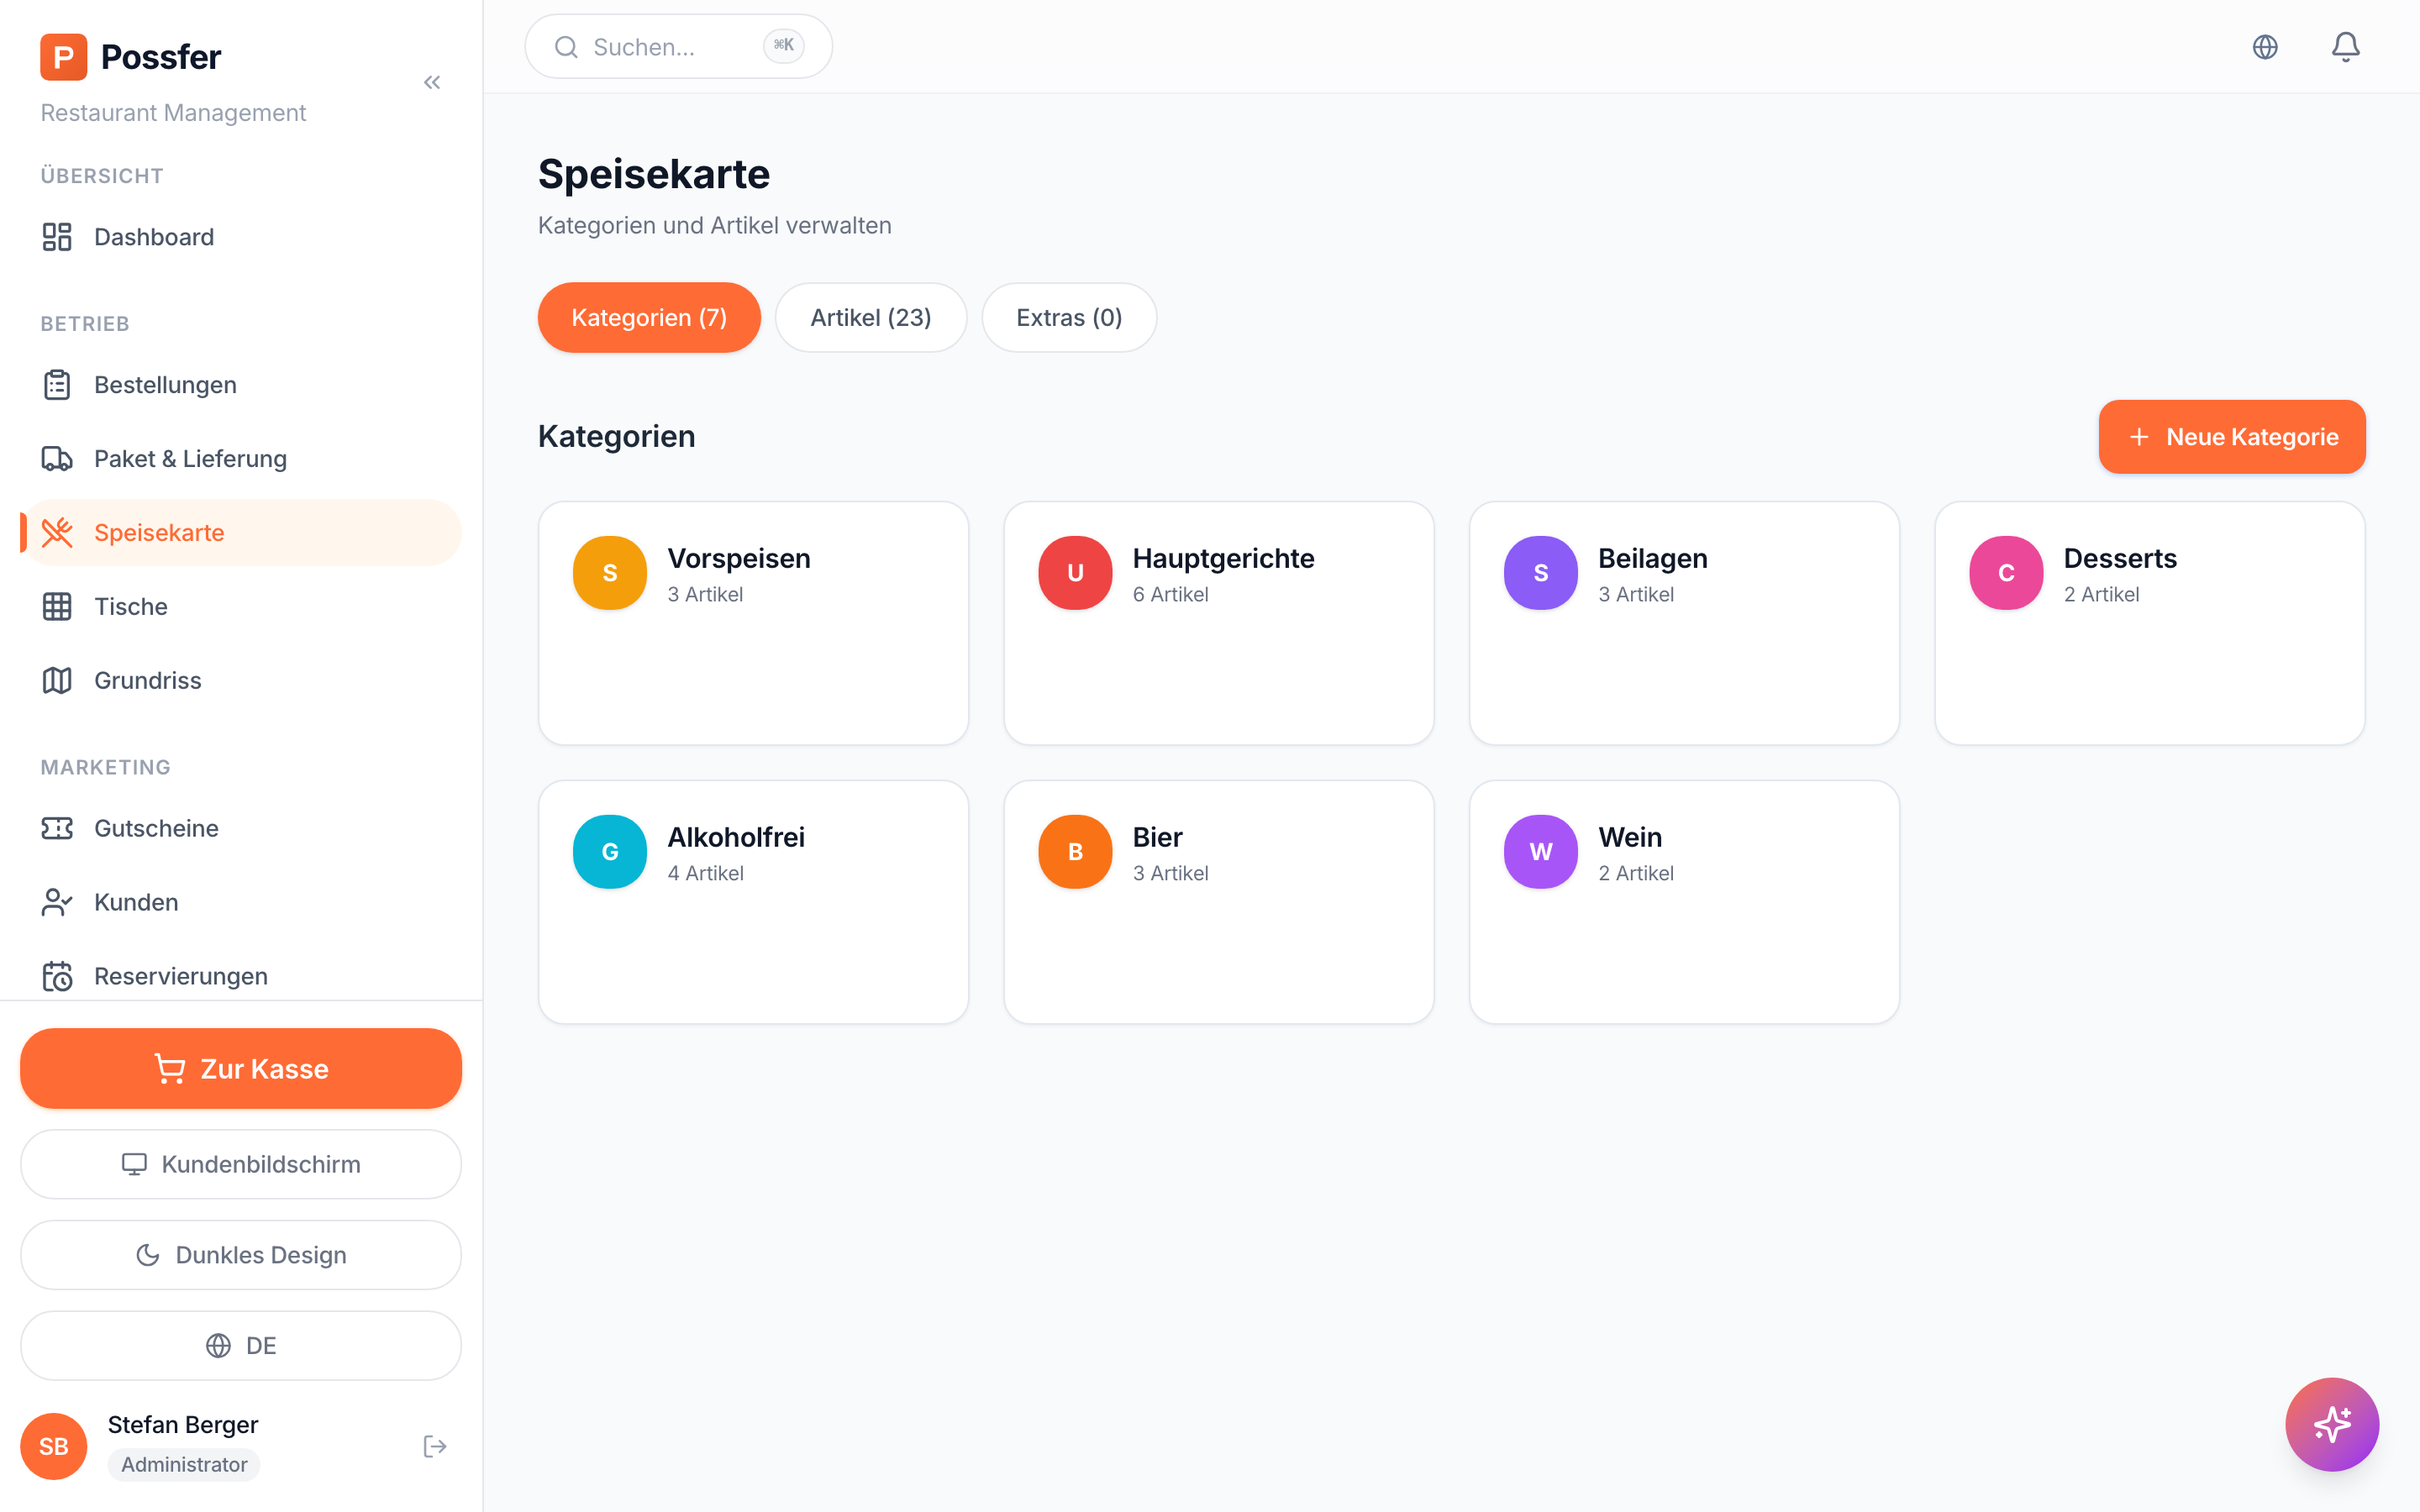
Menu and pricing
 1
2
3
4
5
6
1
2
3
4
5
6
- 1"Kategorien" = Categories, such as starters and mains
- 2"Artikel" = Items. Prices live here
- 3"Extras" = Modifiers, such as sides or add-ons
- 4"Neue Kategorie" = New category
- 5"Bearbeiten" = Edit the record
- 6"Löschen" = Delete
- Open Speisekarte (menu).
- Create categories such as starters, mains and drinks, and order them.
- Add items: name, price, category, and which printer they route to.
- Mark drinks correctly — the tax treatment depends on it.
- Set the tax rate for the item. If you are unsure, ask your accountant.
- Define modifiers under Extras: portion sizes, add-ons, cooking preferences.
Tables and floor plan
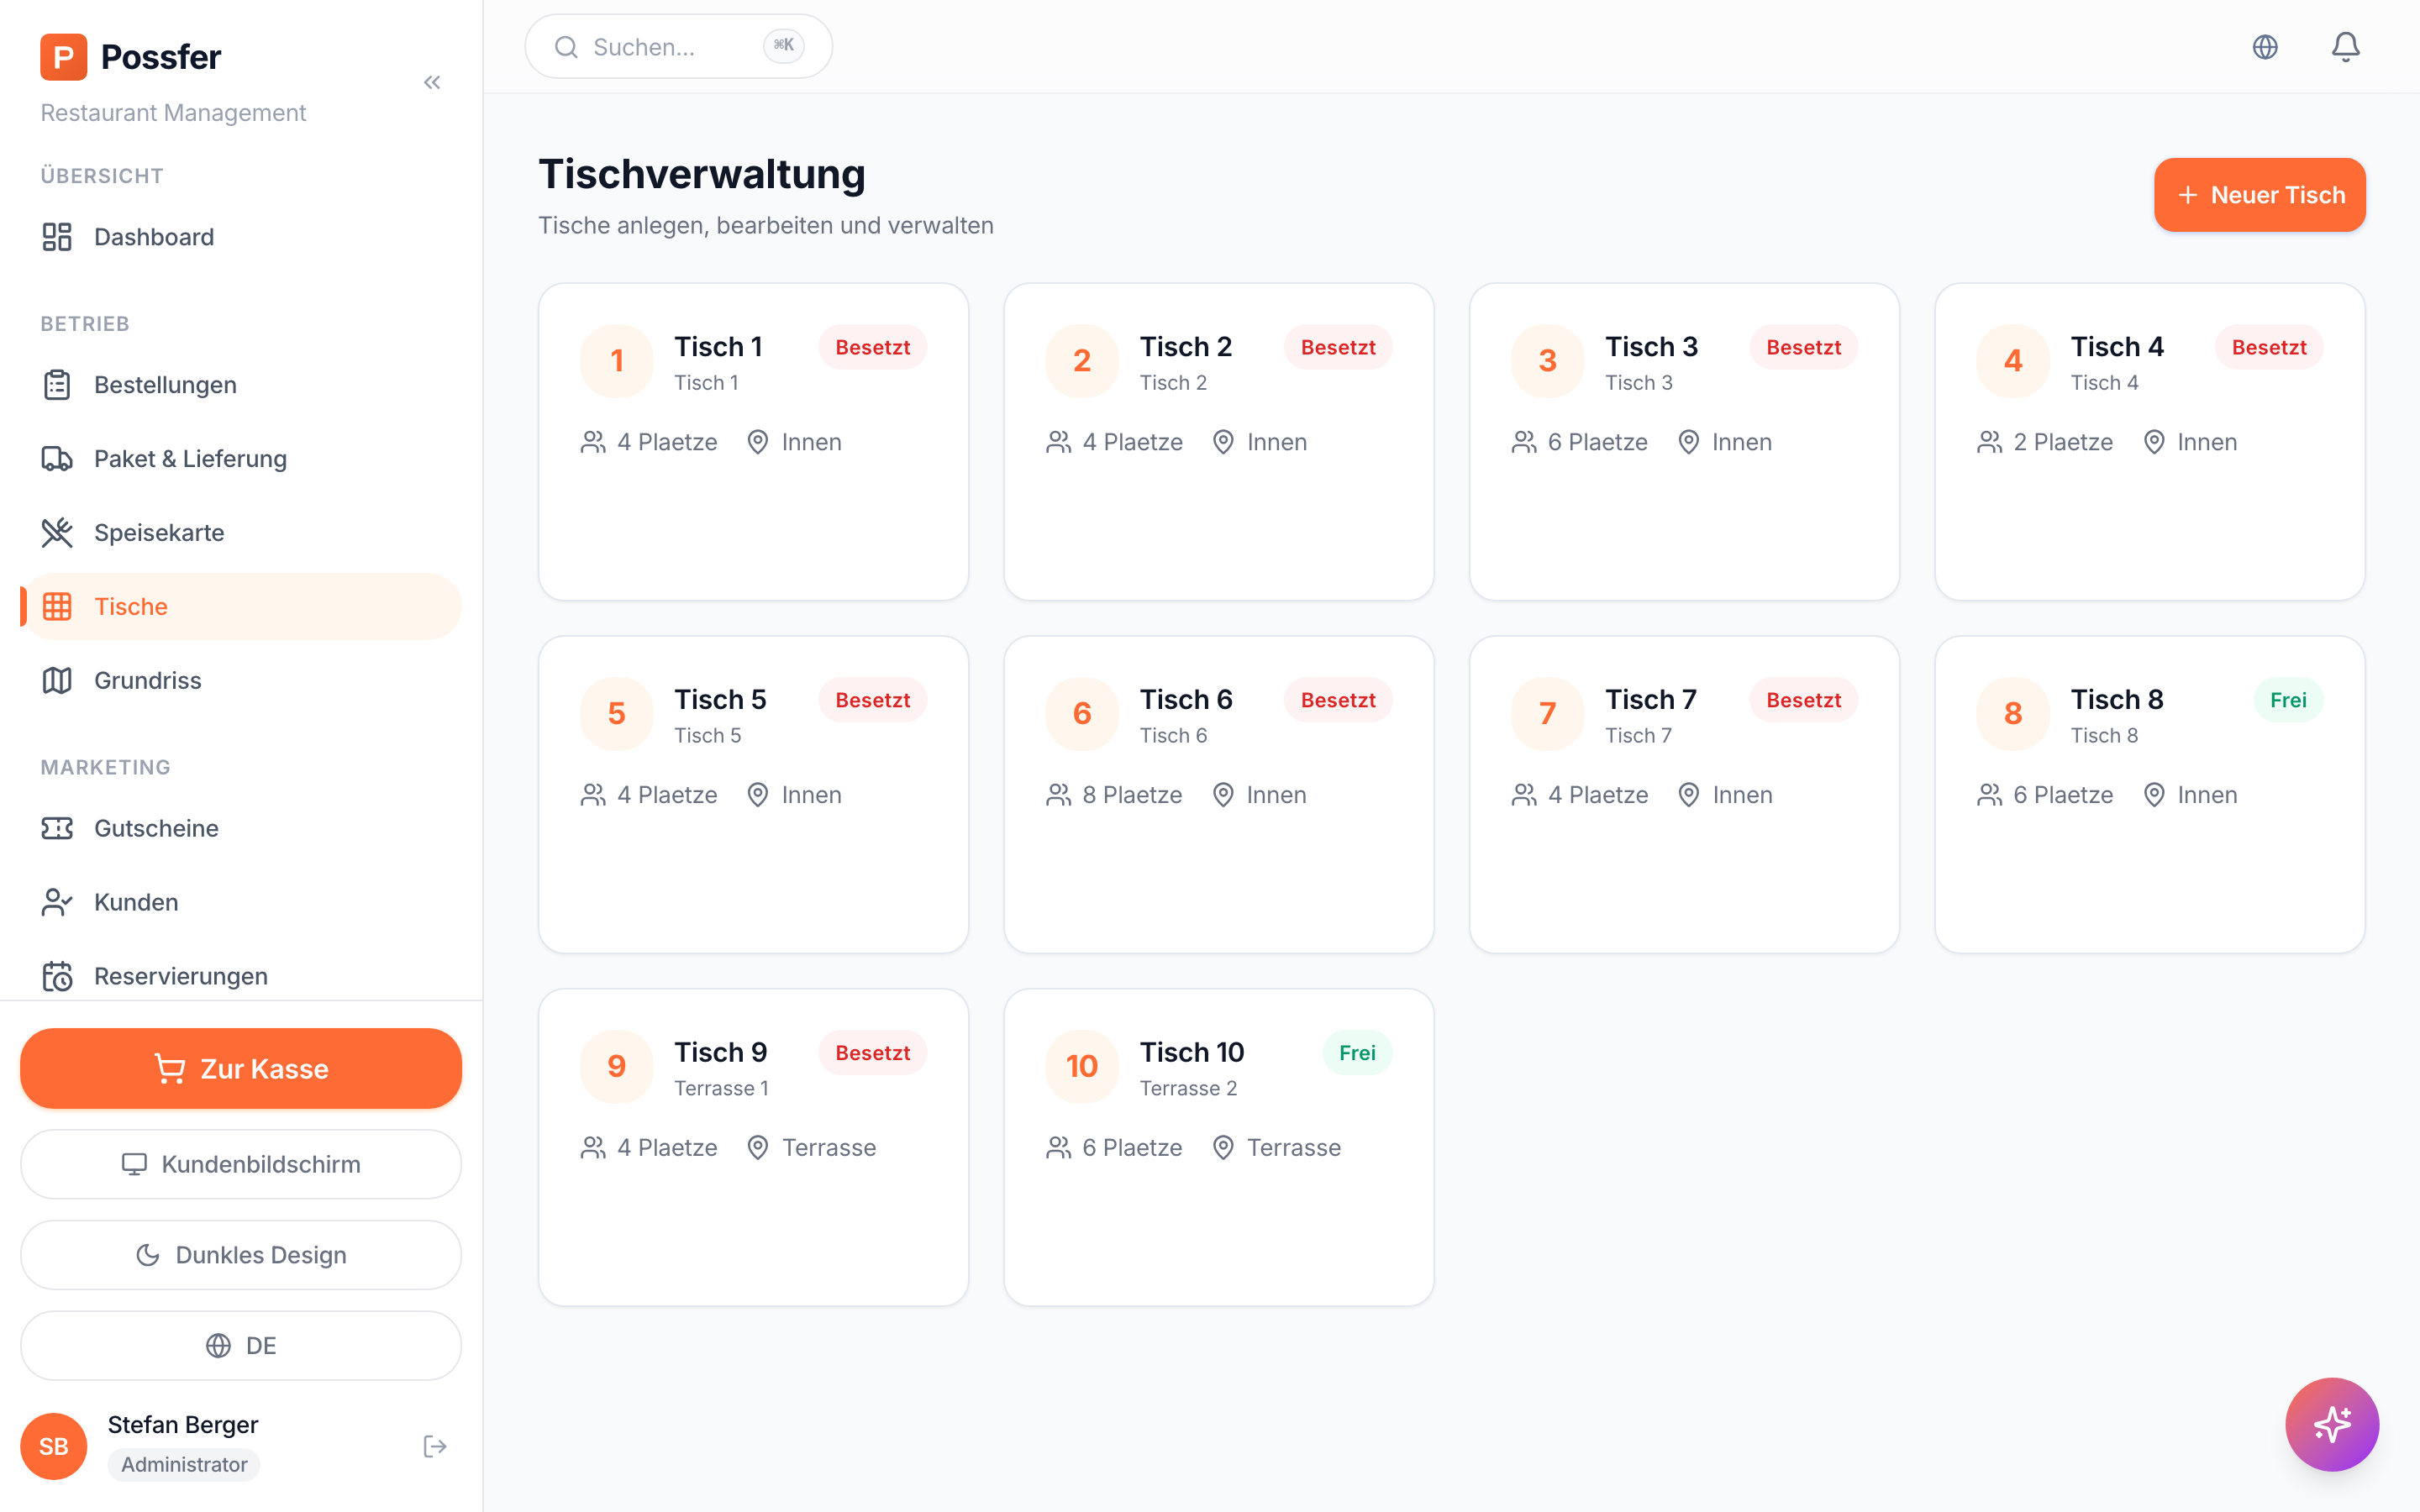
Tables are defined with a number, name, seat count and area. The floor plan screen lets you drag them into the real room layout so the till mirrors the dining room.
 1
2
3
1
2
3
- 1"Neuer Tisch" = New table: number, name, seats, area
- 2"Bearbeiten" = Edit the table
- 3"Löschen" = Delete the table
Orders
Bestellungen (orders) lists every open and closed ticket. Open one to see its lines, total, payment state and timeline — this is where you answer "how long did table six wait" and "which ticket was voided".
Reservations
- Enter the guest's name, phone and party size.
- Pick the date and time and assign a table.
- Mark the booking seated when the guest arrives.
- Close it as a no-show if they do not — this is kept on the guest record.
Inventory
Ingredients are held with a unit, a unit cost and a quantity on hand. Define recipes and stock depletes automatically as items sell.
- Ingredients — name, unit, cost, quantity on hand.
- Recipes — how much of each ingredient a menu item consumes.
- Deliveries — add quantity when stock arrives.
- Waste — record spoilage so it shows up in food cost.
Staff and shifts
Shifts are planned on the Schichten (shifts) screen: pick the employee, the date and the start and end time, then update the status as the shift progresses.
Guests and loyalty
Kunden (guests) holds the guest record: contact details, visit count, total spend and notes such as allergies or a preferred table. Select the guest at payment so the visit is recorded.
Gutscheine (vouchers) covers gift certificates and discount codes — each with a code, a value, an expiry and a usage limit. Rabatte (discounts) holds standing rules such as staff or student pricing. Loyalty defines points earned per dollar and how points convert back.
CHAPTER 6Day end and tax
This is the part auditors care about. These steps are part of the daily routine and should not be skipped.
Daily closing
 1
2
3
4
1
2
3
4
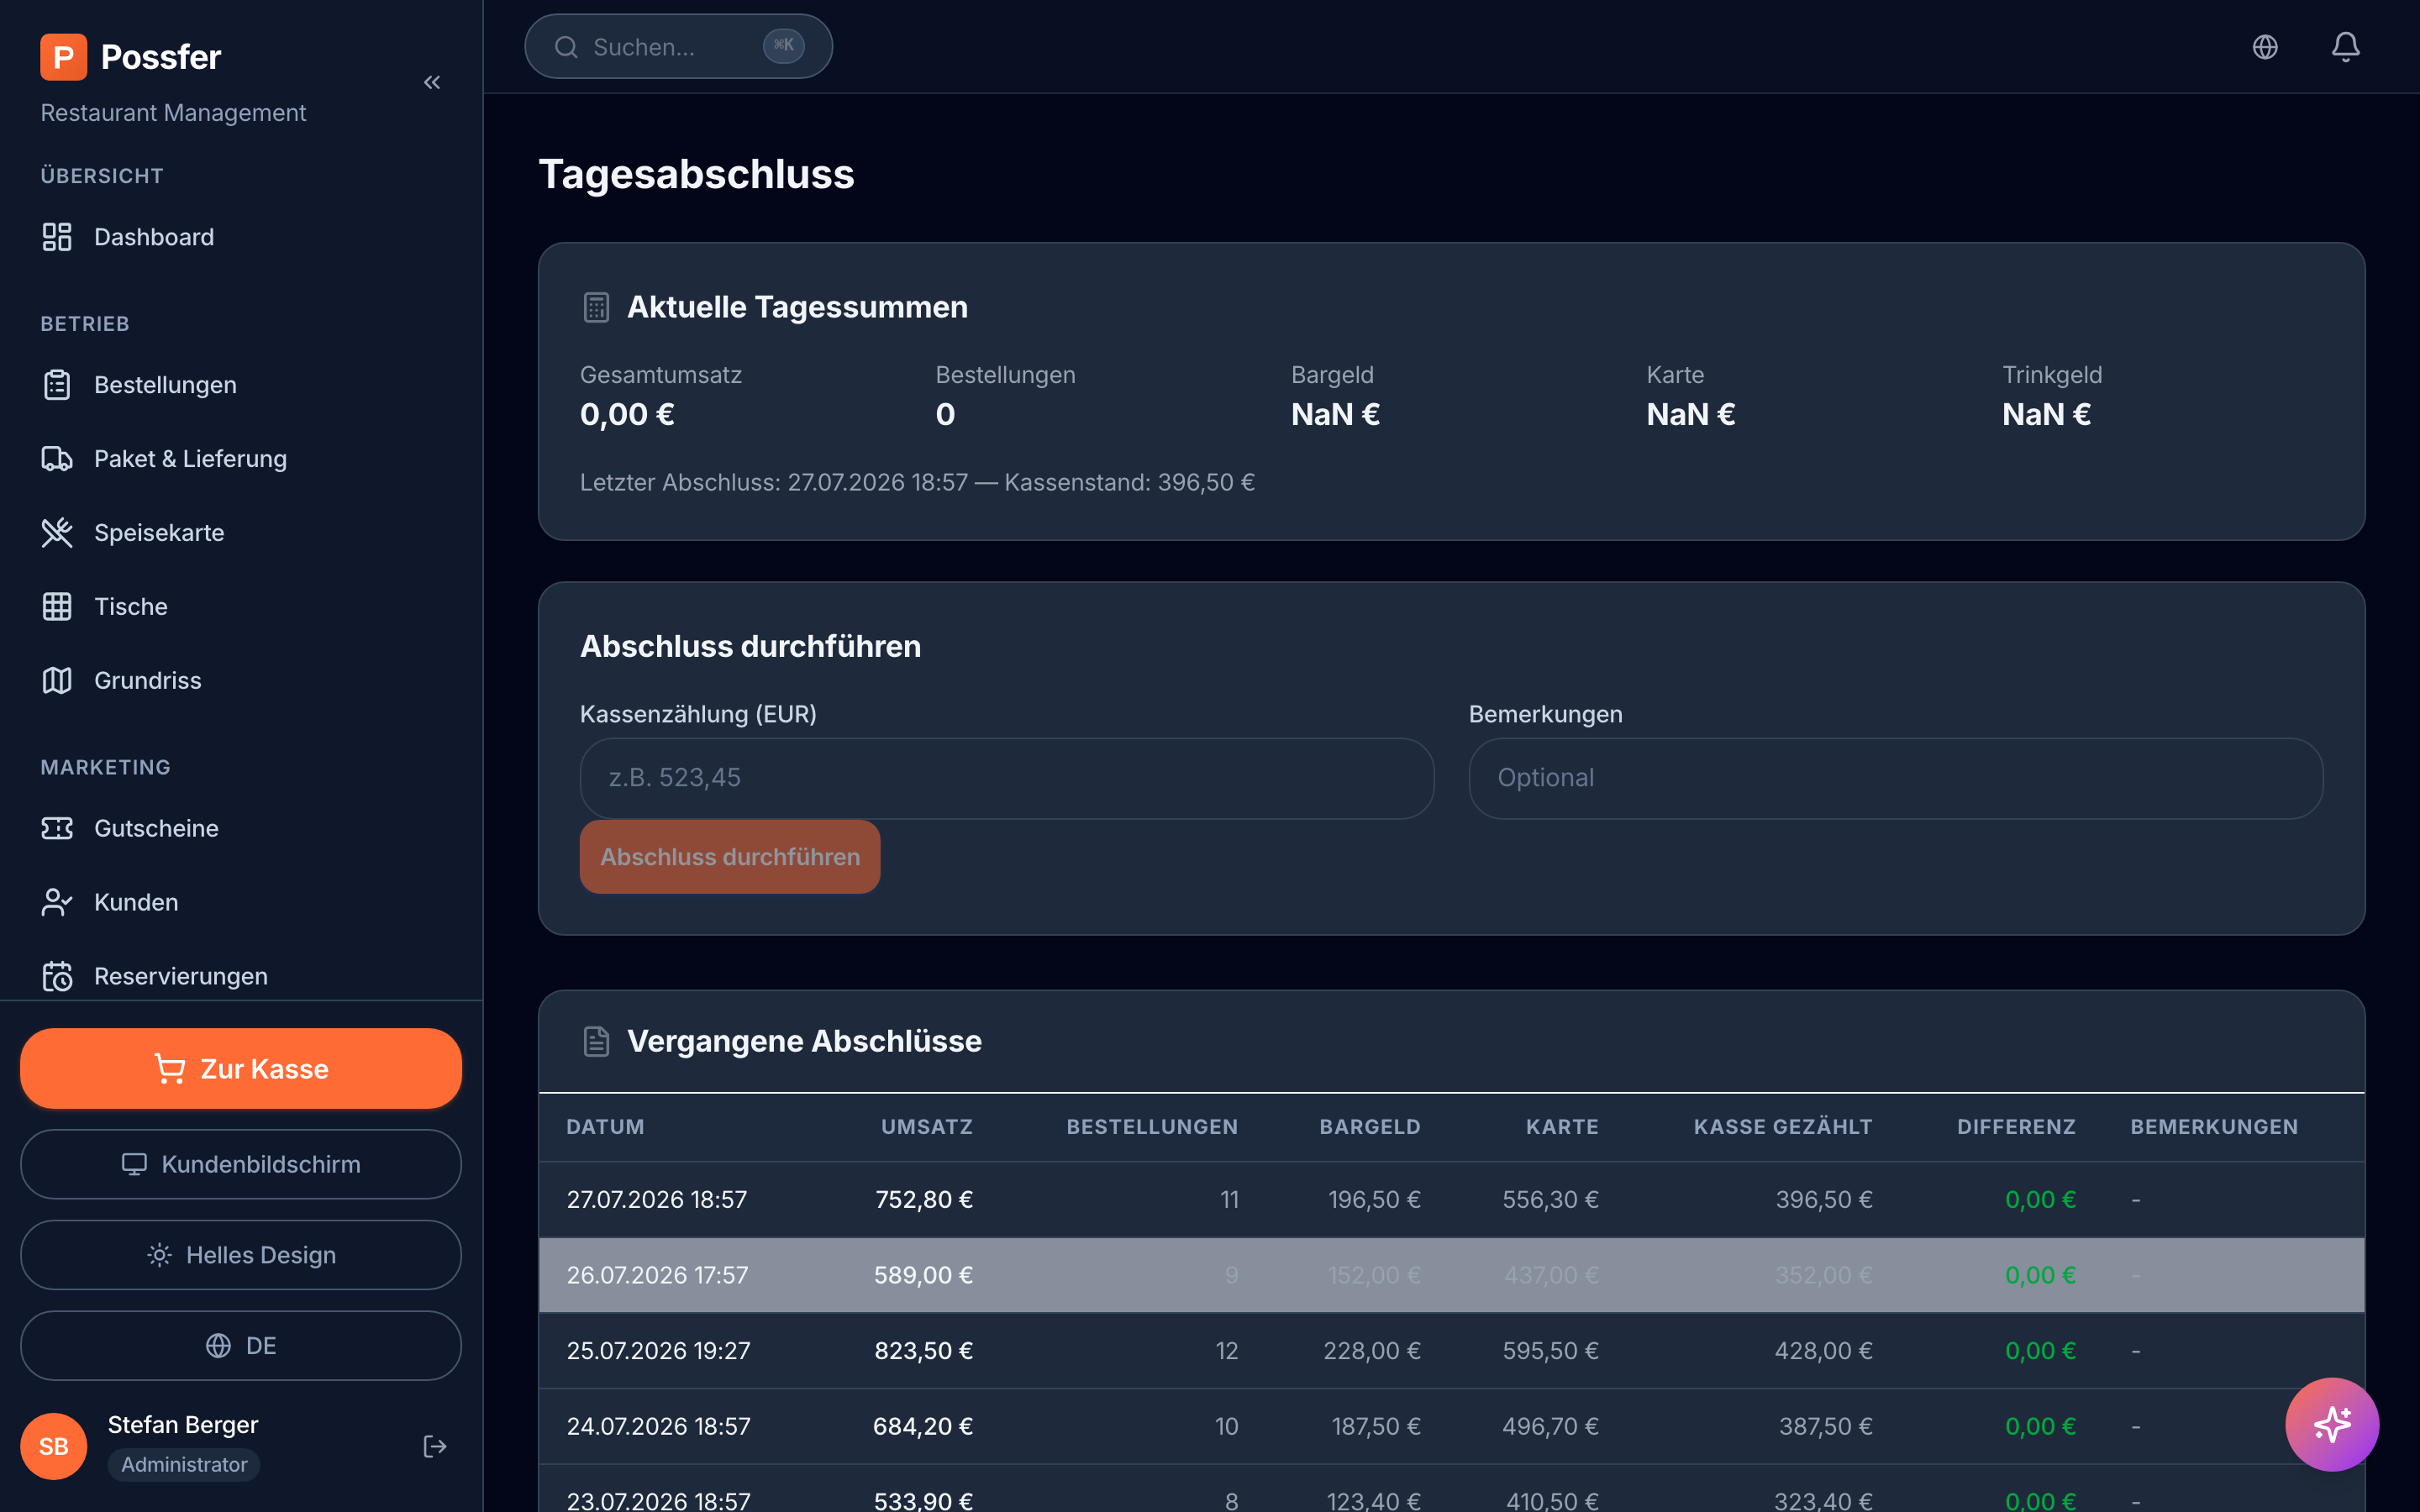
- 1Today's totals: sales, order count, cash and card split
- 2"Kassenzählung" = Cash count. Enter what you physically counted in the drawer
- 3"Abschluss durchführen" = Perform closing. This cannot be undone
- 4"Vergangene Abschlüsse" = Past closings. Every day's Z-report is kept here
- After service, open Tagesabschluss (daily closing).
- Read the day's totals: sales, order count, cash, card and tips.
- Physically count the cash drawer.
- Enter the counted amount in Kassenzählung (cash count).
- Add a note in Bemerkungen if anything needs explaining.
- Press Abschluss durchführen to close the day.
Cash book
Cash movements that are not sales belong here: floats added, cash paid out to a supplier, change runs. Each entry carries a date, an amount and a description.
Tax and accounting export
For the European deployment the system produces a standard audit export and an accounting export for the bookkeeper. Both are reached from the reports screen.
CHAPTER 7Delivery orders
Through the ordering middleware, tickets from delivery marketplaces arrive directly in the system instead of on a separate tablet per platform. They appear in the same kitchen queue as everything else.
The connection is set up once from the integrations screen. After that the menu can be pushed out and orders flow in automatically.
CHAPTER 8Vendor console
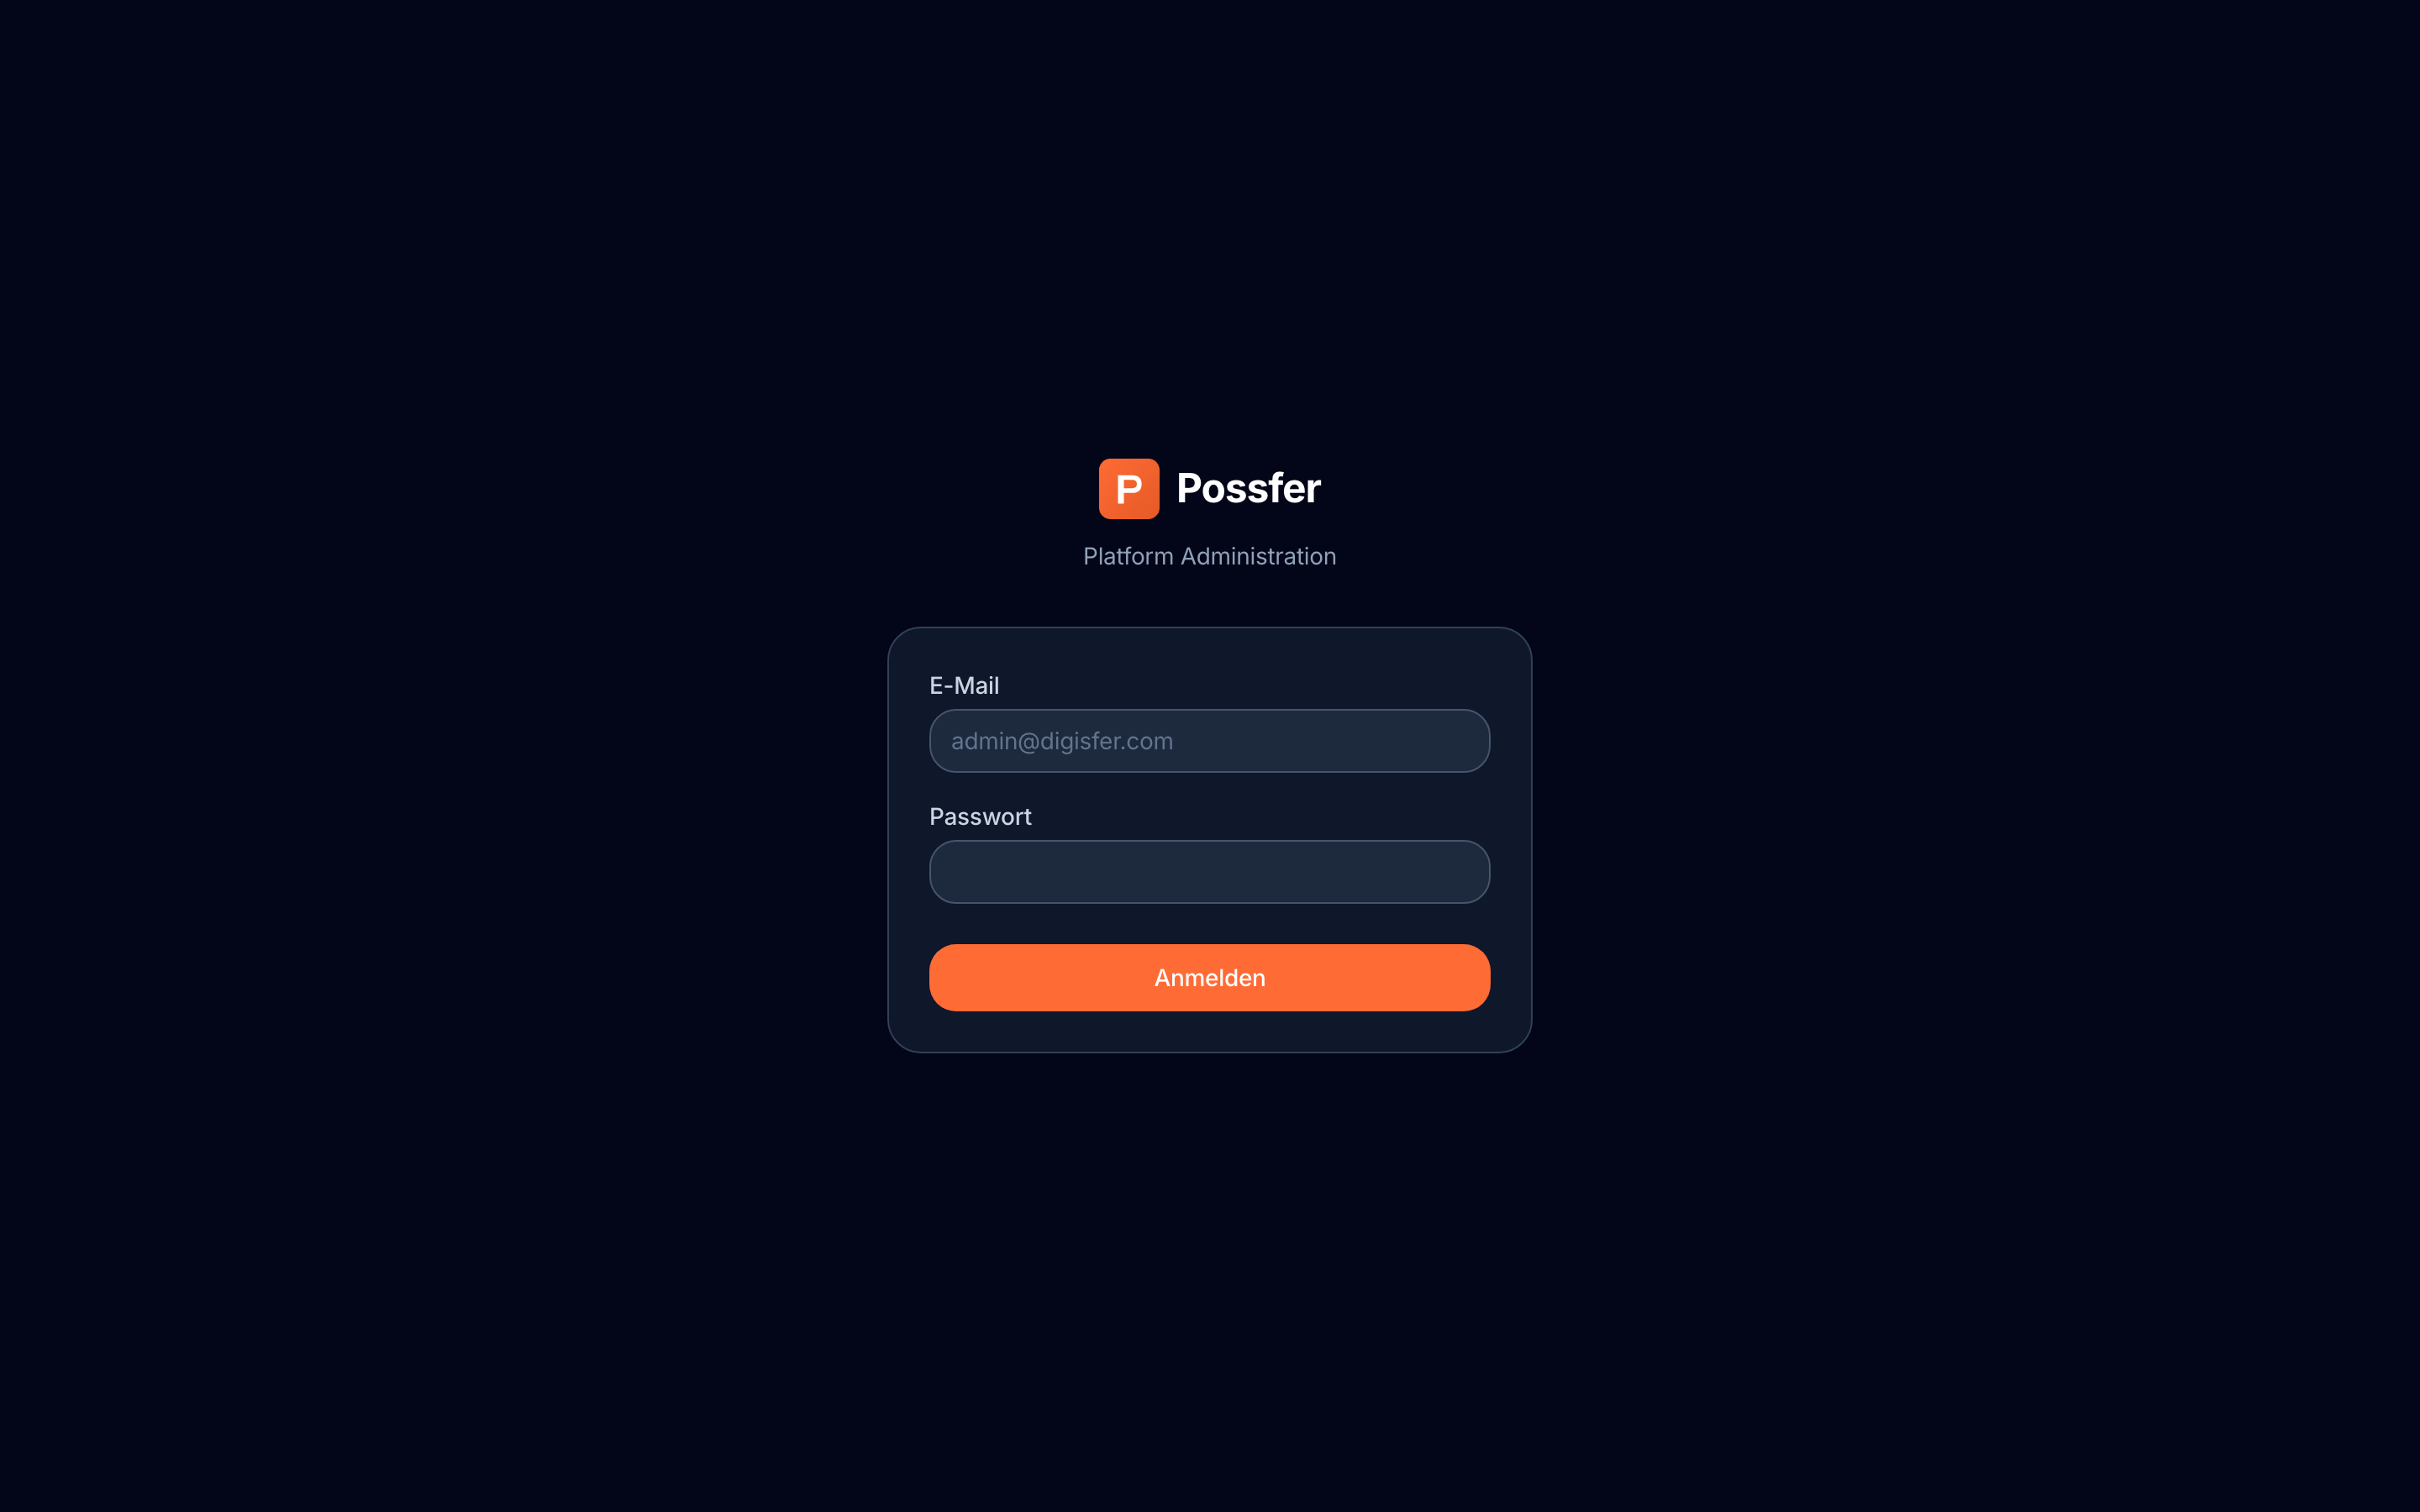
This console belongs to the company operating the software, not to the restaurant. Customer
accounts are opened here, plans are assigned and platform activity is logged.
Address: /platform/login.
 1
2
3
1
2
3
- 1Vendor administrator email
- 2Password
- 3Sign in to the console
 1
2
3
4
1
2
3
4
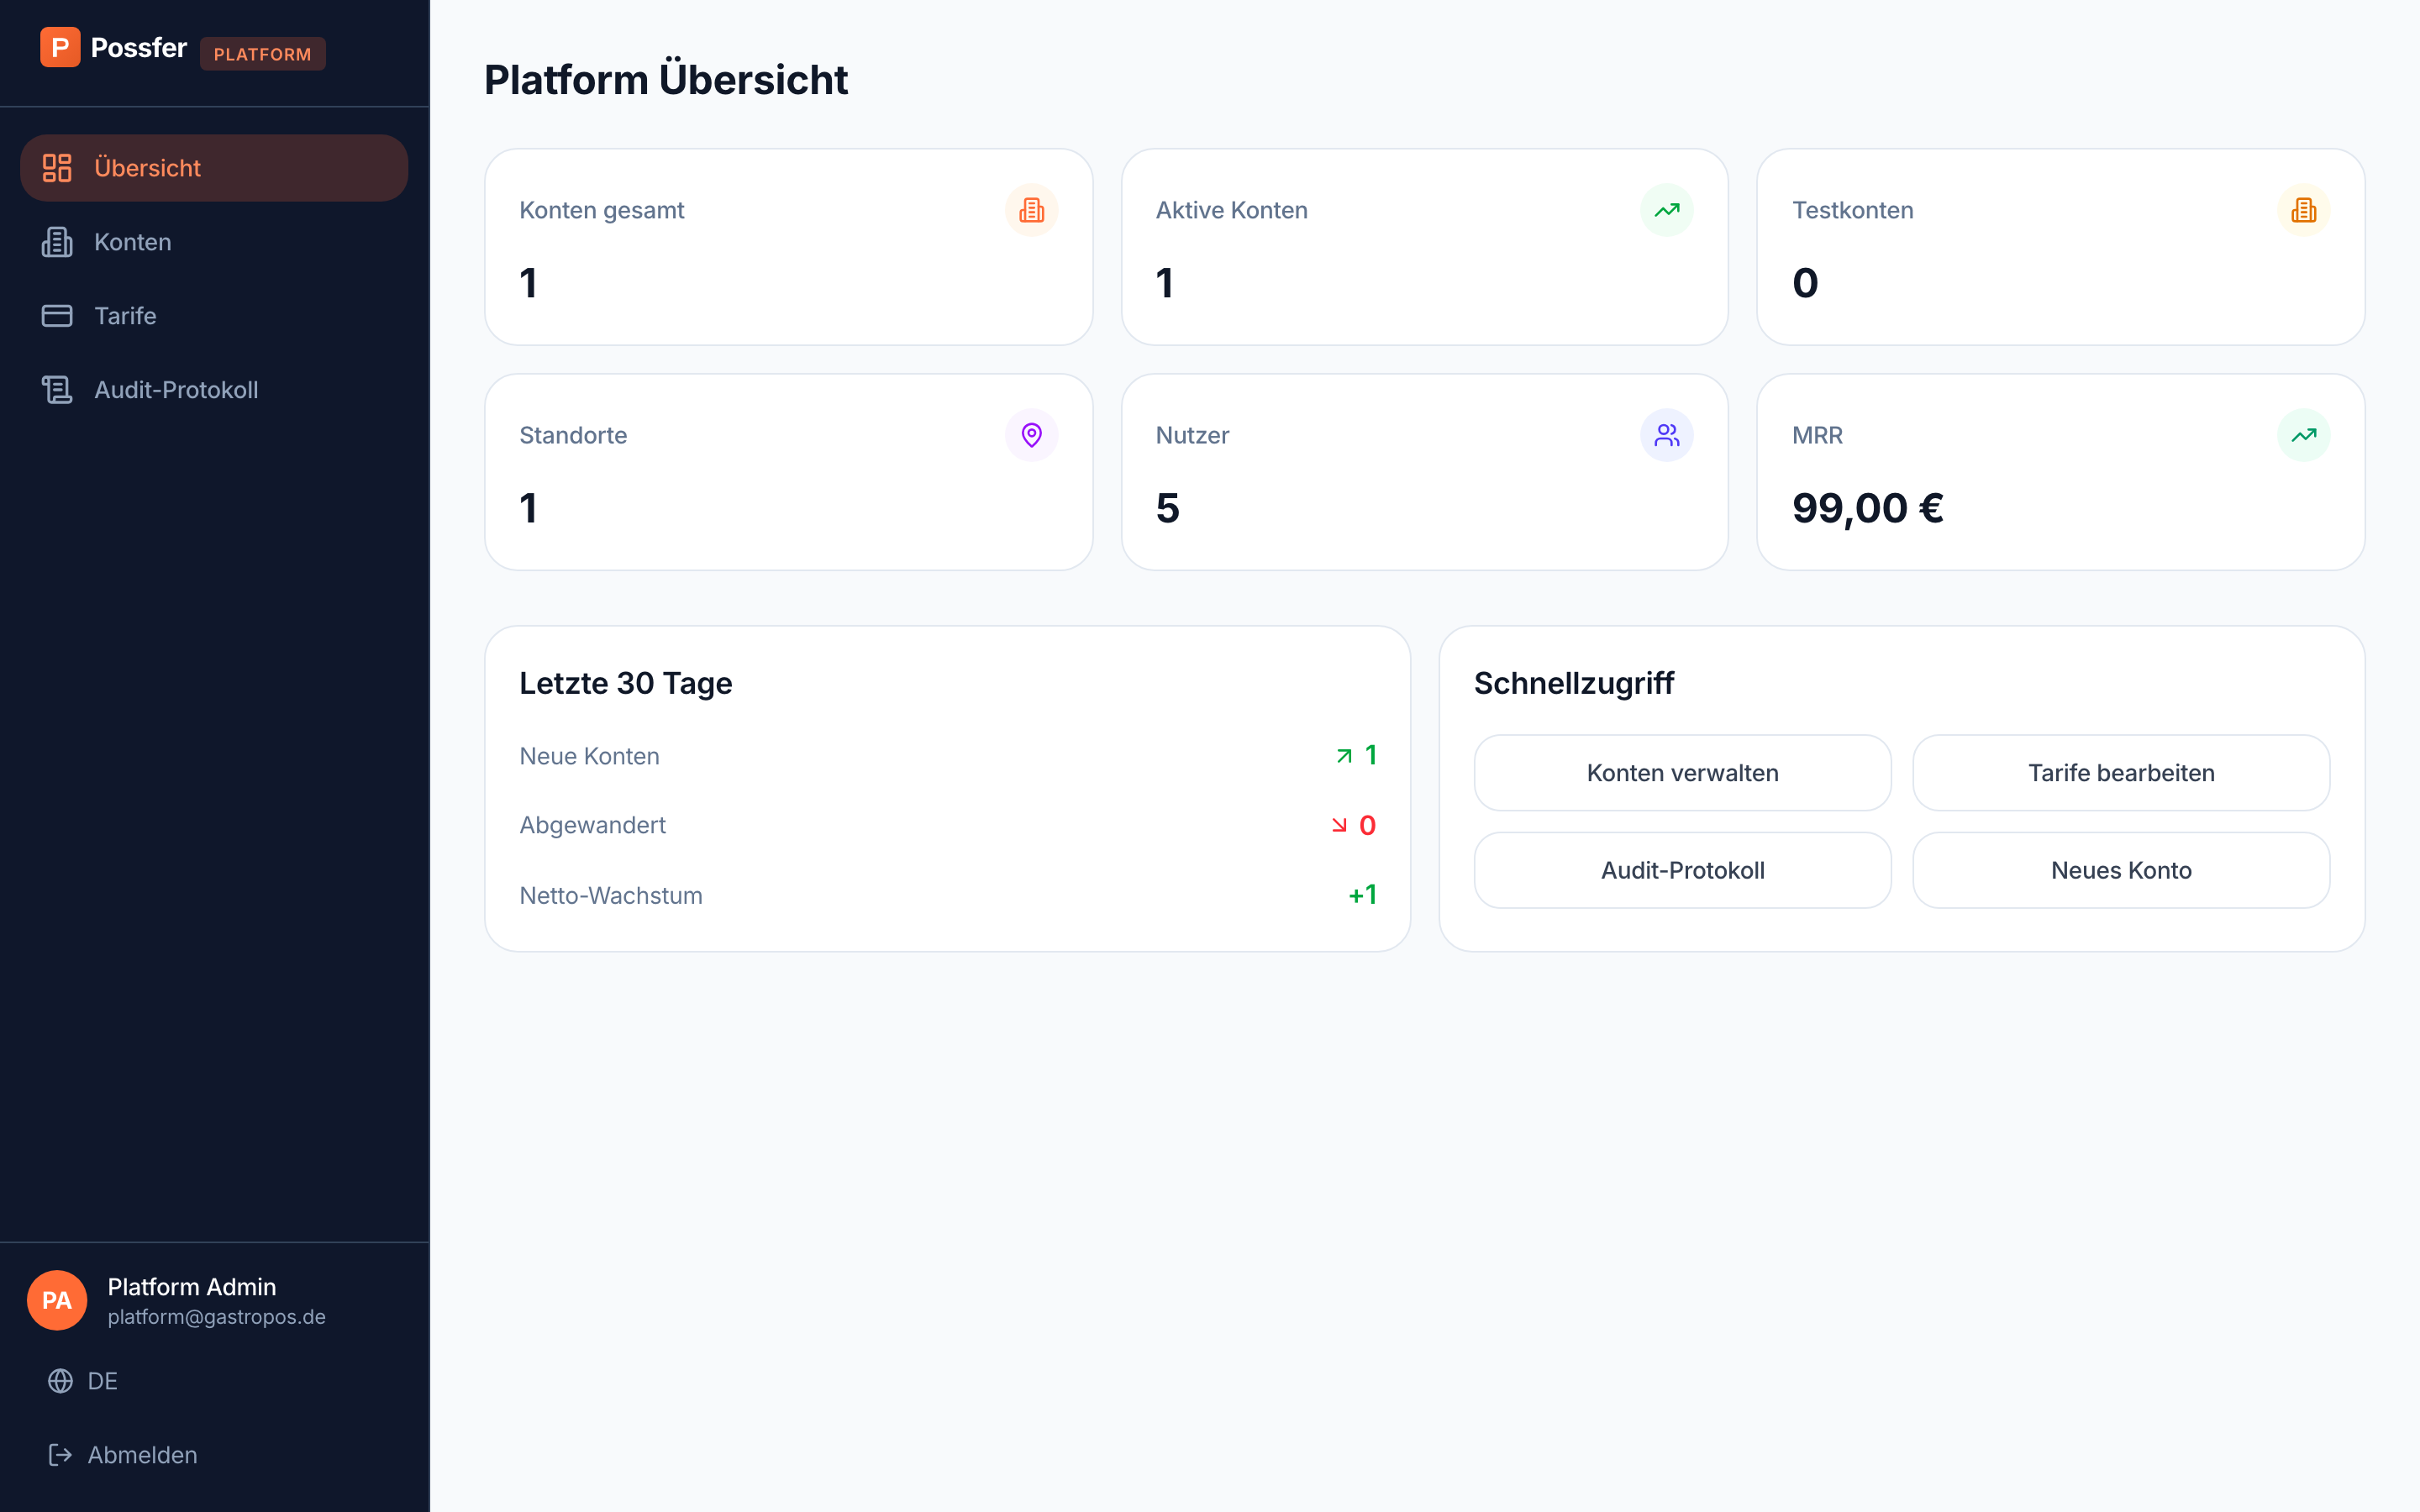
- 1Total customer accounts
- 2Monthly recurring revenue
- 3"Konten" = Accounts: create a restaurant and assign its plan
- 4"Audit-Protokoll" = Audit log: who changed what on the platform
Opening a new restaurant account
- Open Konten (accounts).
- Create a new account: company name, contact email, phone, billing address, tax number.
- Choose the subscription plan.
- Save and send the customer their first administrator credentials.
- The customer then sets up their own menu, tables and staff.
CHAPTER 9Troubleshooting
| Symptom | What to do |
|---|---|
| Kitchen screen shows "Offline" | Nothing is lost; the screen refreshes every 30 seconds. Check the network. If it persists, report it. |
| An order is not on the kitchen screen | Make sure it was sent with Bestellen. Items left in the cart never reach the kitchen. |
| The payment window is stuck | Do not close it and do not take the payment again. Wait a minute, then check the order status on the orders screen. |
A screen shows NaN |
It can appear before any data exists for the day. It should resolve after the first sale; if it persists, report it. |
| Cash variance at day end | Expected if cash tips were left in the drawer. Separate the tips before counting or note it in remarks. |
| Reports, cash book or staff screen will not open | Known issues. Read day totals from the daily closing screen; ask support for exports and for adding staff. |
| The kiosk shows a loading spinner forever | Known issue. Do not put the kiosk in front of guests yet. |
| Signed out of the vendor console | Happens on page refresh. Sign in again and use the left menu. |